Home Window
The Home Window in the Mac client looks like this:
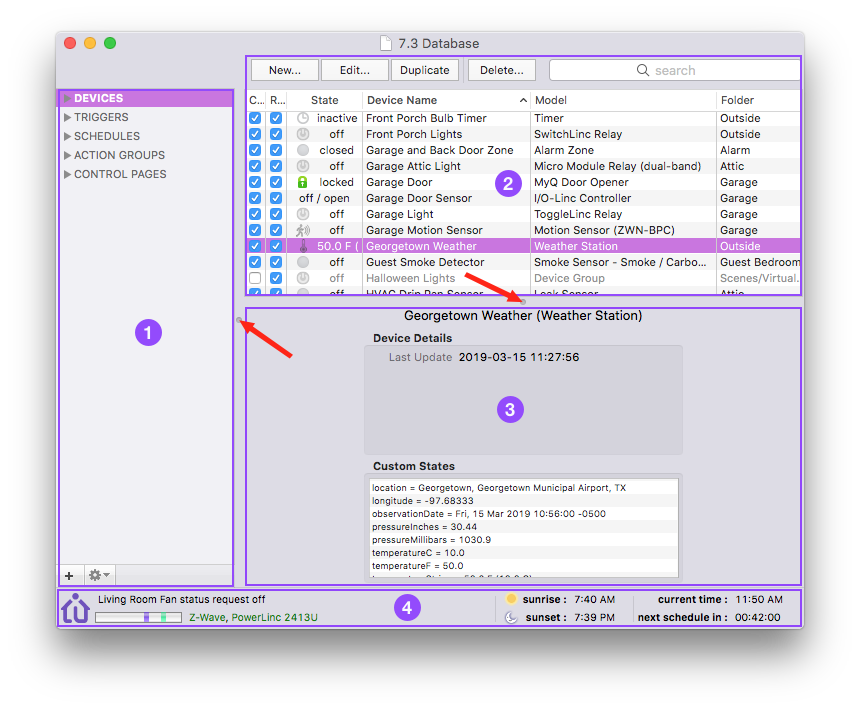
The Home Window has 4 areas:
- Outline View
- Item List
- Item Detail
- Status Bar
The first 3 areas can be resized using the standard macOS split view handles (see the red arrows in the above image).
Outline View
The outline view shows all high-level objects (except Variables which have their own window): Overview, Overview, Overview, Overview, and Overview. Selecting one of these in the outline view will switch the Item List to view all of those types of objects. The same goes for folders that are under the high-level headings except only the objects in those folders will show.
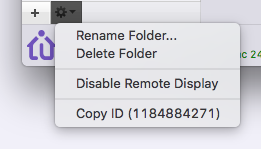
To create a new folder, select the main object type in the list then click the plus (+) button lower-left corner of the outline view. A new folder will appear and you can just start typing its new name.
You can select a folder then click on the gear icon in the lower-left (see the image above) or right-click the folder (bring up the contextual menu). The resulting menu will have the following options:
Rename Folder...allows you to rename the folder.Delete Folderwill do just that. If the folder isn't empty, it will show you a sheet with 3 options:Cancel(do nothing),Delete Items(delete the items in the folder along with the folder), orMove Items(move the items to the parent first then delete the folder).Disable/Enable Remote Display(for devices, action groups, and control pages) will show/hide it in remote clients (like Indigo Touch for iOS and Web, the DomoPad 3rd party client for Android, etc).Copy ID (123456789)will copy the unique folder ID for use in Python scripts.
To move an object to a folder, just drag it from the list view onto the folder (or top-level object) - somewhat like moving mail messages from the inbox to a mail folder in the Mail application.
Item List
The Item List contains the items contained in the object that's selected in the Outline View - so if DEVICES is selected, then all devices in your system are shown. If you have one of the device folders selected, only the devices in that folder are shown.
The buttons above the table view perform actions on items in the list - the buttons will work on whatever list is displayed in the Item List. So, if you have DEVICES (or a device folder) selected in the Outline View, the item list will show devices and the buttons will operate on that list - New... device, Edit... the selected device, Duplicate the selected device, or Delete the selected device(s). The search bar will filter the list.
The image above shows all possible columns in the device view. However, if you right-click on the table header:
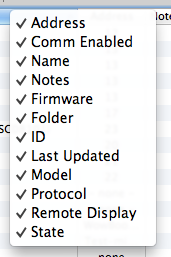
you can customize what columns are shown by checking/unchecking them in the list. Several of the columns have a checkbox in them - you can check/uncheck the feature for the object by clicking on the checkbox. In a few rare cases the checkbox will be disabled (grayed out).
Every Item List is customizable in this regard. Also, if you right-click on a device:
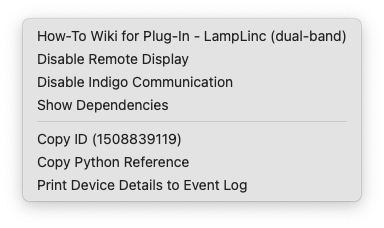
This menu will:
- Take you to the How-To wiki for that device type - if it's a plugin device, it will take you to the help page supplied by the plugin developer.
- Toggle remote display - this tells Indigo whether to show the device in remote clients.
- Toggle communication with the device - this effectively enables/disables the device. If a device is disabled, it will show up gray in the list.
- Open a window that shows all other objects that are dependent on this device. See Deletion Dependencies for more information.
- Copy the unique ID of the device to the clipboard - to assist in writing Python scripts that use the device
- Copy a Python script string that will return an instance of the selected device. It will look like this:
indigo.devices[91776575] # "Living Room Switch" - Print all the information about a device to the Event Log window. It will look something like this:
address : 3B.04.7A
batteryLevel : None
blueLevel : None
brightness : 0
buttonConfiguredCount : 0
buttonGroupCount : 1
configured : True
defaultBrightness : 100
description : valve
deviceTypeId :
displayStateId : brightnessLevel
displayStateImageSel : DimmerOff
displayStateValRaw : 0
displayStateValUi : 0
enabled : True
energyAccumBaseTime : None
energyAccumTimeDelta : None
energyAccumTotal : None
energyCurLevel : None
errorState :
folderId : 810233868
globalProps : MetaProps : (dict)
     com.indigodomo.indigoplugin.alexa : (dict)
          publish-device : true (bool)
          sub-type : Valve (string)
          voice-name : valve (string)
greenLevel : None
id : 1508839119
lastChanged : 2021-09-25 08:24:22
lastSuccessfulComm : 2021-09-25 08:24:22
ledStates : []
model : LampLinc (dual-band)
name : Insteon Dimmer
onBrightensToDefaultToggle : True
onBrightensToLast : False
onState : False
ownerProps : emptyDict : (dict)
pluginId :
pluginProps : emptyDict : (dict)
protocol : Insteon
redLevel : None
remoteDisplay : True
sharedProps : com.indigodomo.indigoserver : (dict)
states : States : (dict)
     brightnessLevel : 0 (integer)
     onOffState : off (on/off bool)
subModel : Plug-In
subType : Plug-In
supportsAllLightsOnOff : True
supportsAllOff : True
supportsColor : False
supportsRGB : False
supportsRGBandWhiteSimultaneously : False
supportsStatusRequest : True
supportsTwoWhiteLevels : False
supportsTwoWhiteLevelsSimultaneously : False
supportsWhite : False
supportsWhiteTemperature : False
version : 67
whiteLevel : None
whiteLevel2 : None
whiteTemperature : None
Triggers and Schedules have a contextual menu when you right-click on them that will allow you to:
- Enable/disable the event.
- Hide executions in the event log - they trigger will continue to execute but nothing will be reported in the Event Log window.
- Open a window that shows all other objects that are dependent on this trigger/schedule. See Deletion Dependencies for more information.
- Copy the unique ID of the trigger or schedule to the clipboard - to assist in writing Python scripts
- Copy a Python script string that will return an instance of the selected device. It will look something like this:
indigo.triggers[565290390] # "Motion Sensor Dawn Triggered"
Action Groups have a contextual menu when you right-click on them that will allow you to:
- Toggle remote display - this tells Indigo whether to show the device in remote clients.
- Open a window that shows all other objects that are dependent on this action group. See Deletion Dependencies for more information.
- Copy the unique ID of the device to the clipboard - to assist in writing Python scripts that use the device
- Copy a Python script string that will return an instance of the selected device. It will look something like this:
indigo.actionGroups[1703232002] # "Toggle Variable"
And finally, Control Pages also have a contextual menu:
- Toggle remote display - this tells Indigo whether to show the device in remote clients.
- Show in Browser - open the control page in the default browser.
- Copy the unique ID of the device to the clipboard - to assist in writing Python scripts that use the device
- Copy a Python script string that will return an instance of the selected device. It will look something like this:
indigo.controlPages[249813574] # "iPad Landscape"
Item Detail
The item detail area shows controls and extra state information depending on what type of object is selected.
Devices
Device controls are separated into a variety of control tiles that are laid out in a grid in the Item Detail area. We also refer to this as the control area. If you have no device selected, the control area is blank. If you have a single device selected, you may see a variety of different control tiles. The first tile that will always be showing is the Device Details tile:
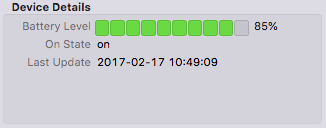
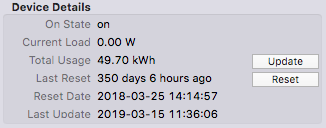
The information in the tile will be specific to the device type. For instance, battery powered devices (that report their battery status) will show the battery level. For sensor devices, the sensor reading will show (temp, humidity, etc. for instance). All devices, regardless of type, will show Last Update - the last date/time that the device was changed in any way.
Plugin devices, regardless of whether they implement one of the built-in device types below or if they are completely custom devices, will also have a Custom States tile that will show all the device's custom states. This tile is always below the first row of tiles so you may need to scroll or resize the Item Detail area to see it:
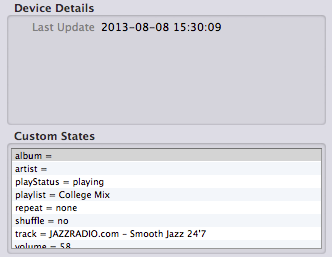
If you right-click a custom state, you will see the following contextual menu with several options:
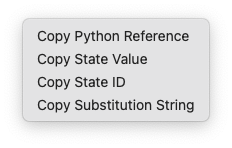
- Copy Python Reference will copy the full reference to that state that you can use in a Python script. It will look something like this:
indigo.devices[1604256801].states["album"] # State "album" of "MightMini iTunes" - Copy State Value will copy the string value of the state to the clipboard so you can paste it somewhere else.
- Copy State ID will copy the ID of the state for use in a Python script.
- Copy Substitution String will copy the appropriately marked up string that you can use in a variety of dialogs to substitute the value of the state at runtime. It will look something like:
%%d:1604256801:album%%
Other device types will show specific control tiles based on their type as discussed below.
Lights/Appliances
For lights (dimmers) and appliance modules (relays or On/Off devices), you see On/Off/Brightness Controls tile:
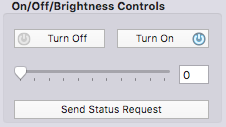
If the device doesn't support dimming, those controls will be hidden. You'll also notice that in the Device Details tile, On State and Brightness (if it's a dimmer) will show the current values.
For lights that allow users to set the color, you'll see the Color Controls tile:
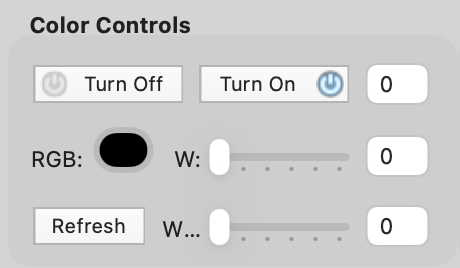
The top row of controls allow you to turn the light On, Off, and the last text field will allow you to type in the brightness (0-100). The second row of controls allows you to set the color and if the light supports it, the white value (also 0-100). If the light doesn't support setting white separately, the slider and text field will not show. The last row will allow you to se the temperature of the white (again, if the light supports it). If the light doesn't allow setting temperature, the Send Status Request button will show instead.
Sensors (Motion Sensors, Energy Meters like the iMeter, etc.)
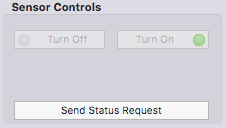
Sensor devices have their own control tile as well. Some of those devices can be explicitly turned On and Off (thus the buttons) and can respond to status requests. The buttons will be enabled/disabled based on the device's capabilities.
One thing to note about some battery powered devices: the Status Request'''' button may be enabled because some of those devices have the option to be plugged in (for instance, the Aeotec MultiSensor) and will respond to status requests when plugged in but not when running on battery power.
Also, some energy monitoring devices, such as the iMeter, keep running totals of energy usage that can be reset by the user. For those, a Reset button will be placed next to the Total Usage in the Device Details tile.
Speed Controls
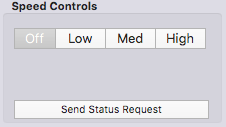
Speed control devices are devices that can control the speed of some kind of motor. For instance, the Insteon FanLinc. And, in fact, the controls are currently tailored to the FanLinc's High, Medium, Low, and Off settings. When we run across more of these types of devices we'll customize the controls appropriately.
Sprinklers
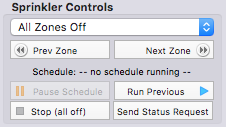
The sprinkler tile allows you to turn on a specific zone, go to the next or previous zone, update the valve status. And, if a schedule is currently running, pause/resume it, begin running the previous schedule, and stop all activity.
Thermostats
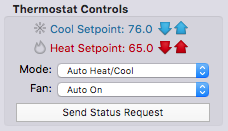
The thermostat tile shows the current temperature, humidity, mode, cool/heat setpoints, and fan mode. You can also adjust all of those as well as refresh the values and turn everything off. Note that on rev2 thermostat adaptors the circles next to cool and heat setpoints will be lit if their respective HVAC system is actually running (A/C or heater).
Generic Output Devices
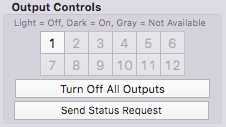
Output Controls tile shows the state of all the output states available for the device and you can update them immediately using the Send Status Request button. The button grid shows all available outputs and their status. Use the Turn Off All Outputs button to turn off all binary outputs.
Triggers and Schedules

The detail area for triggers and schedules is identical - it shows the triggering event (either a state change or some time/date description), whether the condition is always, rules, or a script, and a summary of actions. Depending on your interface, a popup may allow you to specify how the object is processed:
Enabled and Upload- this means that it will be processed both while Indigo Server is running and it will be uploaded to your standalone controller (if it supports uploading).Enable- this means that it will be processed while Indigo Server is running, and mirrors the Enabled column in the list if it's visible.Upload- this means that it will only be uploaded and executed by your standalone controller (if it supports uploading) - while Indigo Server is controlling the logic it will not be enabledDisabled- this means that it's completely disabled - it also mirrors the Enabled column in the list if it's available.
The Execute Conditional Actions button will execute all the actions associated with the object, but only after any conditions specified in the Conditions tab are evaluated (so you can test the conditions).
The Execute Actions Only button will do exactly that - execute all the actions associated with the object without evaluating any conditions specified in the Conditions tab.
Action Groups
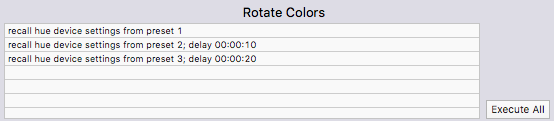
The action group detail shows a list of all the actions in the group. The Execute Actions Now button will do exactly that - execute all the actions associated with the action group.
Control Pages
The only thing in the detail area for a control page is the Show in Browser button, which will open the selected page in the default browser.
Status Bar
The status bar along the bottom of the window has several elements. First, there's the communication queue indicator. It's the longish rectangle next to the Indigo icon. This indicator will show green bars going from right to left, and purple bars going from left to right. Green bars indicate outgoing communication purple bars show incoming communications. If you see green bars begin to build up, you can tell that something is keeping the outgoing command queue from processing correctly.
Next to that bar you'll see the names of the interfaces you have configured. If they are in green, then they are functioning properly. If they are in red with a line through them, Indigo can't communicate with them. If they are gray, they are offline for some reason.
The next four sets are pretty self-explanatory: the next sunrise time, the next sunset time, the current time (for the Indigo Server, so it may be different than the client time if you're running the client on a different machine), and the next time a schedule is going to execute.