Plugins
Managing Plugins
Indigo includes the ability to use plugins developed by 3rd party developers (see our Plugin Store for available plugins) and includes a few useful plugins with the Indigo installation.
Installing/Updating Plugins
Installing new plugins is pretty simple (updating plugins is the same process, it will just replace the existing one if there is an older version installed). We're going to describe a couple of ways of installing them primarily based on where you get the plugin. While you may get a plugin from anywhere, we recommending getting them from our Plugin Store. To download and install a plugin from the store, this is the process (we're using Safari in these steps, so you may need to adjust accordingly if using another browser):
- In Safari on your Indigo Server Mac, go to the Plugin Store and navigate to the Plugin you want to install.
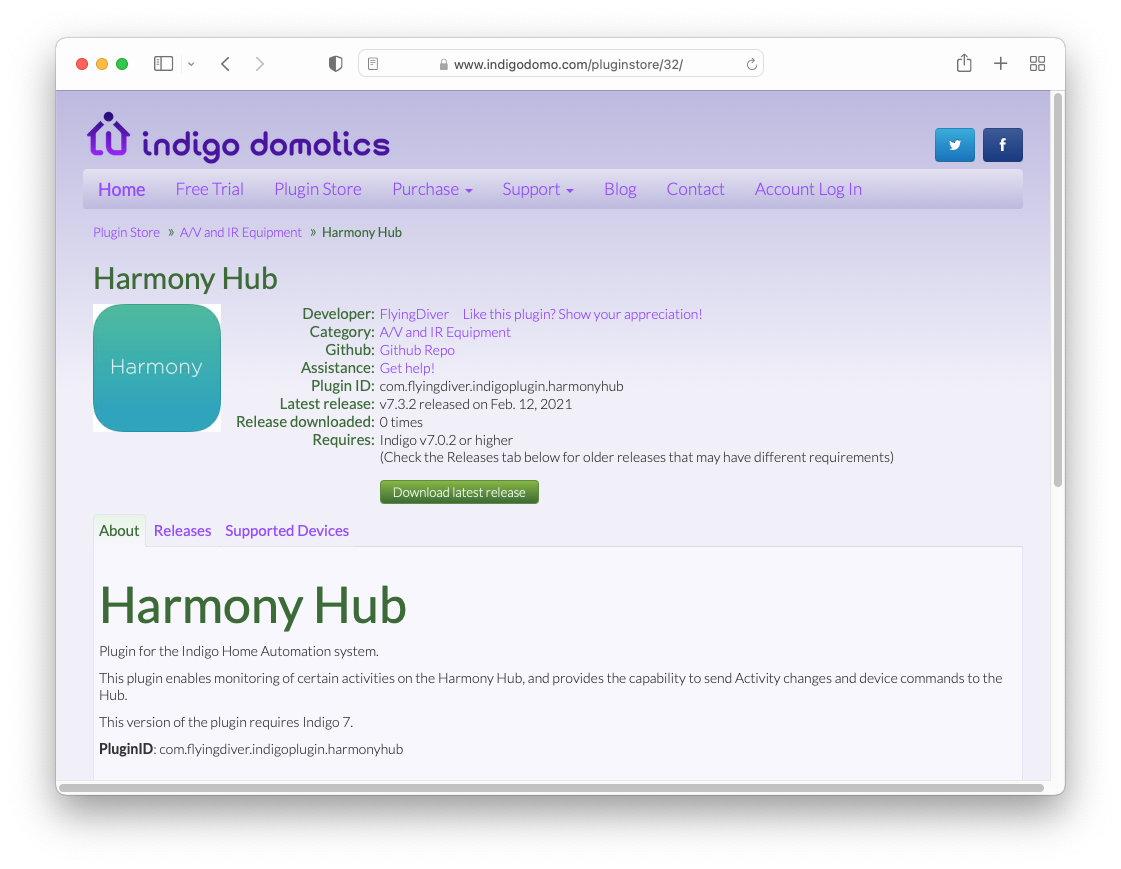
- Make sure that the plugin is supported by this Indigo release (look for the Requires field). This is an important step because there may be older plugins which aren't compatible with the current version of Indigo.
- Click the
Download Latest Releasebutton, which will download the plugin. If the release isn't compatible with your version of Indigo, you can click on the Releases tab, and look through the list for a version that works with your version of Indigo (click on it and then click theDownload this releaselink). - When the download is complete, click on the down arrow in the title bar which will show the plugin download.
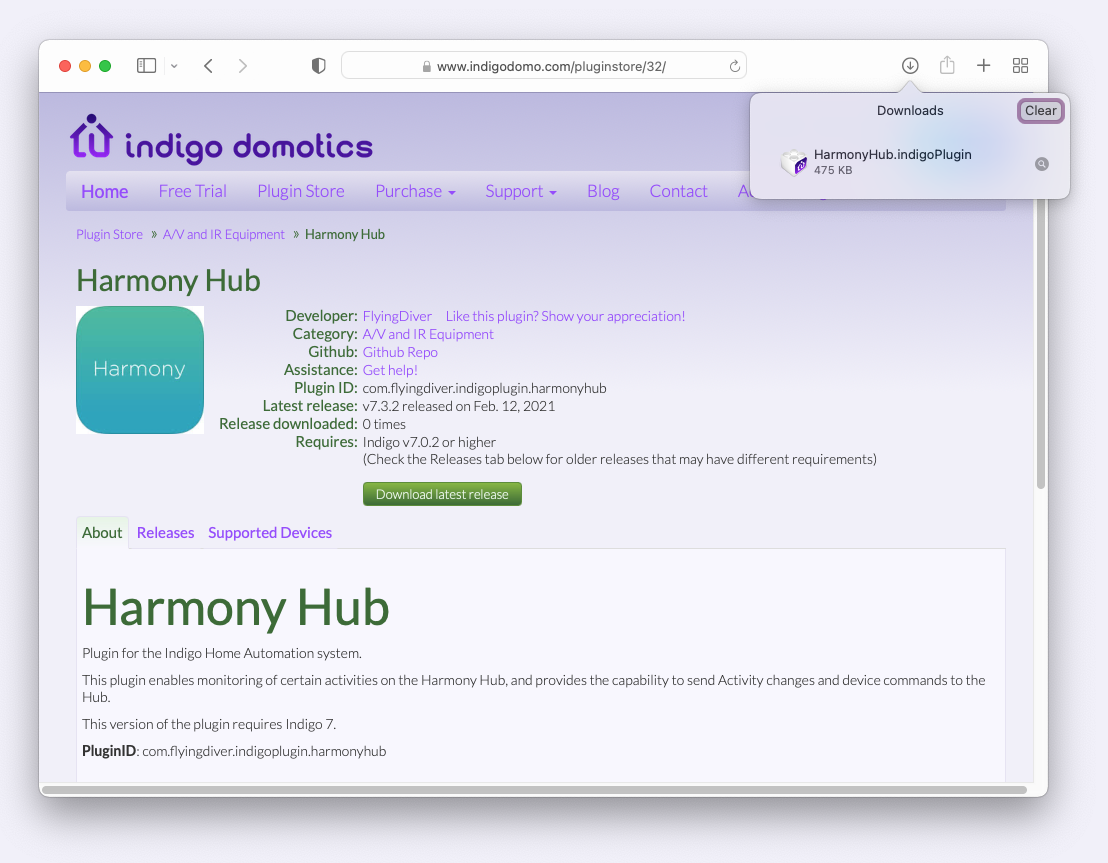
- Most plugins will show the plugin directly as the above image. If it does, double click it and proceed to step 8 below.
- If you see a folder icon (usually with an odd name) in the download dropdown rather than the plugin icon, double-click on the folder and it'll switch to the Finder with the download folder open.
- In the Finder window that's now showing, you should see the plugin which will end in
.indigoPlugin. Double-click that file.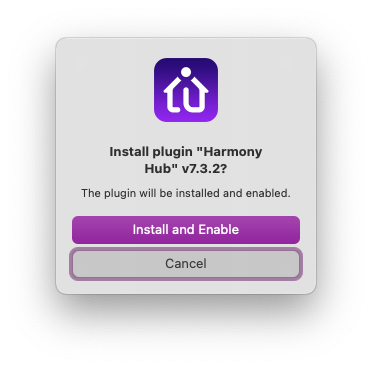
- You will be switched to the Indigo Client app, and you'll a dialog window which asks you if you want to install and enable the plugin. You will see a different dialog if the version number is lower than an already-installed version; for safety, Indigo will ask you to confirm that you want to downgrade the plugin.
- NOTE: due to a bug in some macOS releases, this step may try to launch a previous version of Indigo. If it does, quit it, then right-click the plugin file, select the
Open Withmenu item, then select Indigo 2025.2.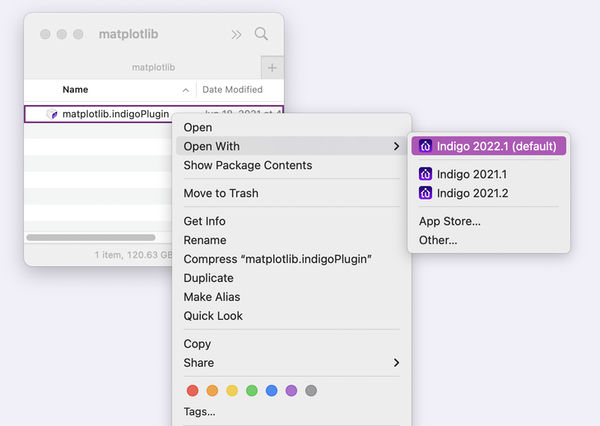
- Click the
Install and Enablebutton. - Done!
Many plugins require some kind of configuration for the plugin itself. If that's the case, then when you click the Install and Enable button, the plugin's configuration dialog may automatically popup:
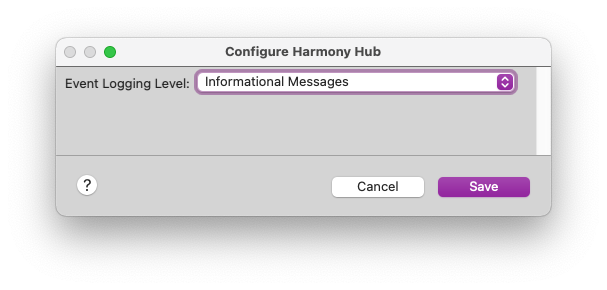
Complete the dialog as necessary (sometimes, as with the example above, you don't have to do anything) and click the Save button. Note: if you click the Cancel button, the plugin may not be fully operational until you completely fill out the dialog and save it.
That's it. As you can see, the experience using the Plugin Store in Safari is straight-forward. However, you may find plugins in other places. When you get a file that ends in .indigoPlugin on your Indigo Server Mac, you can always double-click it in the Finder and then you jump to step 8 above. We encourage all of our 3rd party plugin developers to put their plugins in the Plugin Store so it's easy to find them - you should be cautious about installing plugins that you get from other locations.
Plugin Menus in Indigo
There are a variety of menus in Indigo which will reflect plugin functionality. The first is the main Plugins menu in the Indigo menu bar.
Main Plugins Menu
This is the meta-menu for many things related to plugins.
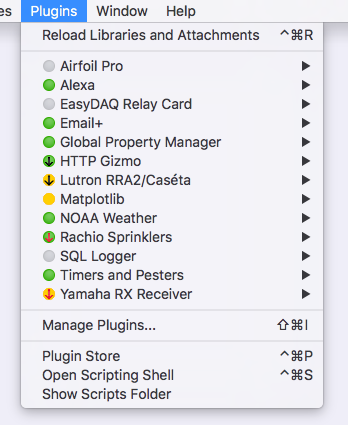
The Reload Libraries and Attachments menu item will allow scripters to add Python libraries to specific locations and use them in Indigo (see Shared Classes and Methods in Python Files for details).
The next section of the menu is dedicated to each plugin that's installed on your system. As you can see, you can tell at a glance the status of the plugin itself:
 a gray dot means the plugin is disabled
 a green dot with no arrows means the plugin is enabled and up to date.
 a green dot with a black arrow means the plugin is enabled and there is an update available that will work with your Indigo version
 a green dot with a red arrow means the plugin is enabled and there is an update available but it won't work with your version of Indigo
There are yellow versions of the dots - the meaning is the same as the green version except it's indicating that the plugin is using an API version that was deprecated with Indigo 2023. You should check the Plugin Store for an updated version or contact the plugin developer.
 a yellow dot with no arrows means the plugin is enabled but needs updating before the next Indigo release
 a yellow dot with a black arrow means the plugin is enabled and there is an update available that will work with your Indigo version - you should install the update before upgrading to the next version of Indigo
 a yellow dot with a red arrow means the plugin is enabled and there is an update available but it won't work with your version of Indigo
There is also a red version of the dot, which can mean several things.
 the plugin is not compatible with your version of Indigo and we are not aware of a version that will work with your version of Indigo.
- the plugin has failed due to a catastrophic error that has caused the plugin to crash or has caused Indigo to stop the plugin. An error will be output to the log to explain the problem.
- the plugin's
self.stopPlugin()method has been called for any reason.
We'll discuss how to change/deal with those states later, but this menu provides a very simple visual dashboard for plugin status.
The Manage Plugins... menu item will open the the Plugins tab of the Indigo Preferences and is discussed below.
The Plugin Store menu item will open the Plugin Store in your default browser, and the Show Scripts Folder will open the Scripts folder (where you can save external scripts in a version-agnostic way).
The Open Scripting Shell menu item will launch the Terminal app and open a window with a Python shell running with all the Indigo API loaded. See the Indigo Scripting Tutorial for more information.
Individual Plugin Submenu
Each plugin installed will have its own submenu on the Plugins menu. For instance, here's the 3rd party Harmony Hub plugin submenu when it's enabled:
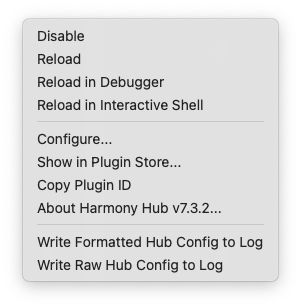
The top section will be available for every plugin
- the first menu item will Enable/Disable a plugin and is a toggle - select `Enable` to enable the plugin and `Disable` to disable the plugin.
- the `Reload` menu item will reload the plugin and will only be present if the plugin is enabled.
- there may be a couple more menus if you have the `Enable debugging menus` item selected in [#the Plugins tab of the Indigo Preferences](#the-plugins-tab-of-the-indigo-preferences) (and are discussed in that section).
The next section contains:
- the `Configure...` menu item will open a config dialog if the plugin has plugin-specific configuration items (if not or if the plugin is disabled, it will not be present).
- the `Show in Plugin Store...` menu item will open the plugin's entry in the Plugin Store in the default browser. If there is an available plugin update that will work on your version of Indigo, the menu title will be `Download New Version...` which will also open the plugin's entry in the Plugin Store in the default browser so you can download the new version, and if there is an incompatible version the menu title will be `Incompatible Version Available...` which will drop a sheet showing what version of Indigo is required to run the new plugin version. This menu item will always show, but if it's grayed out it means the plugin isn't from the [Plugin Store](https://www.indigodomo.com/pluginstore/).
- the `Copy Plugin ID` menu item will always show, and when selected will copy the plugin's unique ID for use in scripts.
- the `About...` menu item will always show the current version of the plugin and will always be enabled.
Any sections below this are specific to the plugin and will contain commands that the plugin presents to the user. If the plugin is disabled, no additional sections will be displayed.
Other Menus with Plugin Items
There are several other places where plugins may insert menu items in the Indigo Mac UI. The first place is in the Device Create/Edit window:
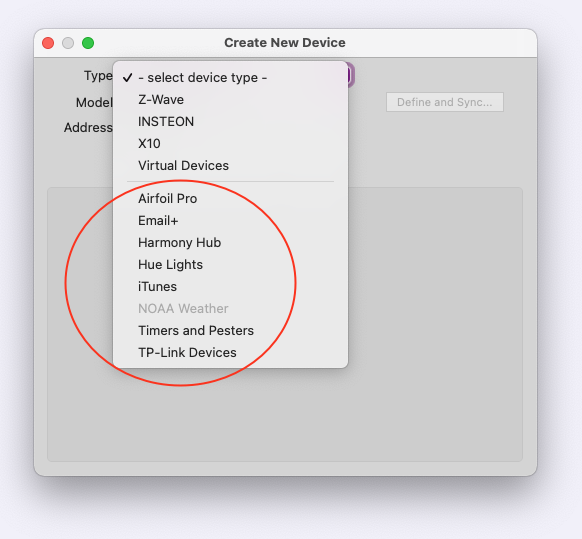
The top half of that menu allows you to create devices from the built-in interfaces. Anything in the bottom half represents plugins that supply new device types that you can create and use in the same way you work with built-in devices (switches, thermostats, etc.). The next place is in the Trigger Create/Edit dialog:
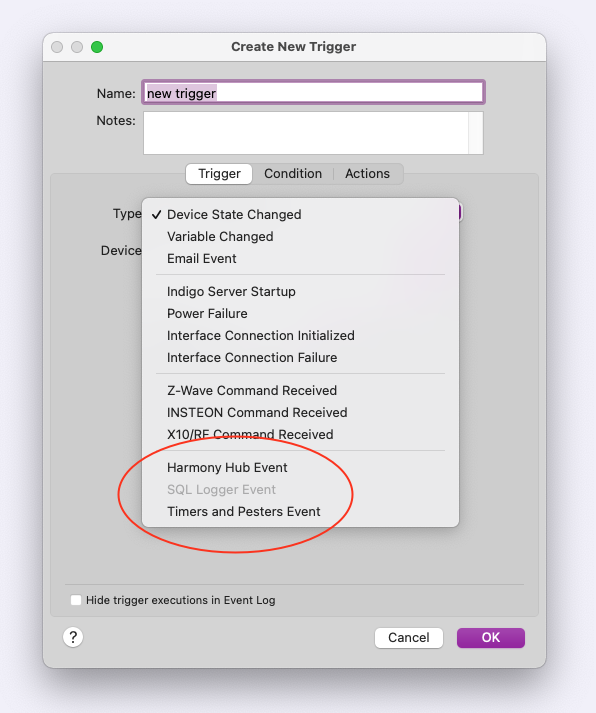
The last section of that menu will show plugins that supply custom events that you can trigger from. The final place that plugins can add menu items is in the Action Create/Edit window:
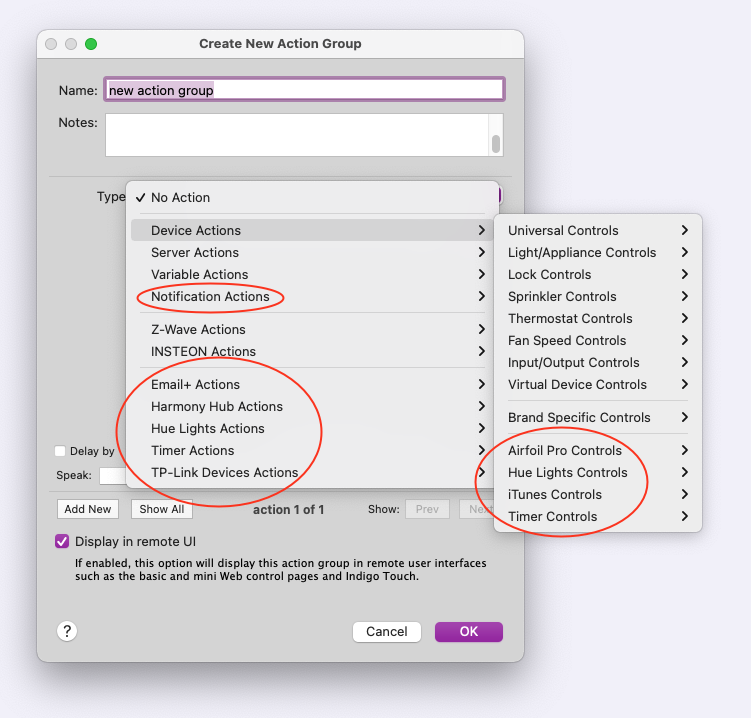
There are actually 3 places where plugins can add menu items to the actions windows: The first is at the bottom of the Device Actions submenu: menus here are for plugin actions that act on devices. The second place is on the Notification Action submenu: plugins that supply some kind of notification action will put their actions on this submenu. Finally, at the bottom of the Action Type menu itself: this is where plugins will add actions that don't fit into the other two categories.
As you can see, plugin integration in Indigo is quite extensive.
The Plugins tab of the Indigo Preferences
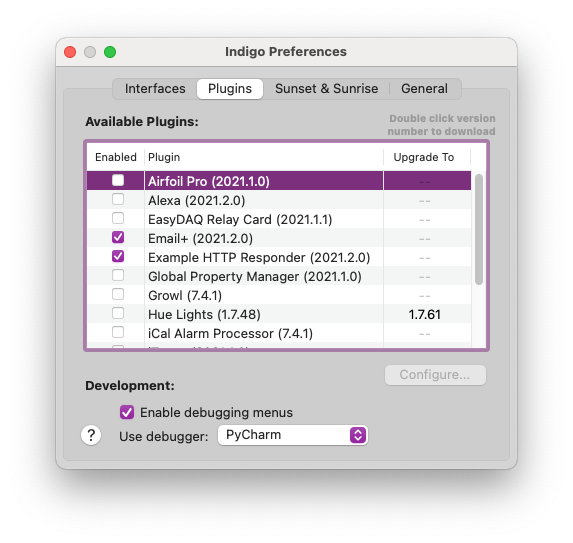
You can also enable/disable a plugin and download a new plugin version from the Plugins tab in the Indigo Preferences. You open the config window choosing the Indigo 2025.2->Preferences... menu item and clicking the Plugins tab or by selecting the Plugins->Manage Plugins... menu item discussed above.
You can enable/disable the plugin from this list (by checking the Enabled checkbox) and you can double-click on the plugin's name (or select it and click the Configure... button) to open the configuration dialog for the plugin (if there is one and the plugin is enabled). Again, if this is the first time the plugin has been enabled this will open the configuration dialog for the individual plugin if the plugin supports a one.
You can also see the current version of the plugin and the version of the most recent release if there is a newer version. If the newer version is not compatible with your version of Indigo, it will show up in red. Double click the new version number open the Plugin Store entry for that plugin in your default browser where you can download the new version and install (see Installing Plugins above for the process).
At the bottom of this tab, you'll notice a section labeled Development. There are 2 options here to help plugin developers with the various tasks needed to develop and test plugins:
- the
Enable debugging menuscheckbox will add two new menus to the plugin's menus:Reload in Debuggerwill reload the plugin and connect to the selected debugger;Reload in Interactive Shellwill open a terminal window with a Python shell that's connected to the plugin so the developer can run commands and inspect arbitrary objects in the running plugin. - the
Use debuggerpopup is used to tell Indigo which debugger to start the plugin up when you use the above menu items.
See the Python Debugger Support forum post for further details on how to use these features to aid in developing a plugin.
Uninstalling a Plugin
If you would like to permanently remove/uninstall a plugin (rather than just disabling it by unchecking the Enabled button or using the menu item for the plugin), you may do so by following these steps:
- In the Indigo app, select the
Help->Show Indigo Server Install Foldermenu item. This will switch you to the Finder and open a window to the Indigo install folder. - Switch back to Indigo and shut down the Indigo Server by selecting the
Indigo 2025.2->Stop Servermenu item in the Mac client (you can leave the client app running). - In the Finder window opened in step 1, you'll see two folders:
PluginsandPlugins (Disabled). Depending on whether the plugin is enabled or not will determine which folder it's in. Open the appropriate folder and delete the unwanted plugin. Check to make sure that somehow there aren't plugins in both locations. - Switch back to the Indigo 2025.2 Mac client and click on the
Start Local Server...button in theServer Connection Statusdialog.
The plugin will no longer show in the Plugins tab or in the Plugins menu.