Conditions
On the Trigger and Schedule dialog, there's a tab named Condition. If you select this tab, you'll see something like this:
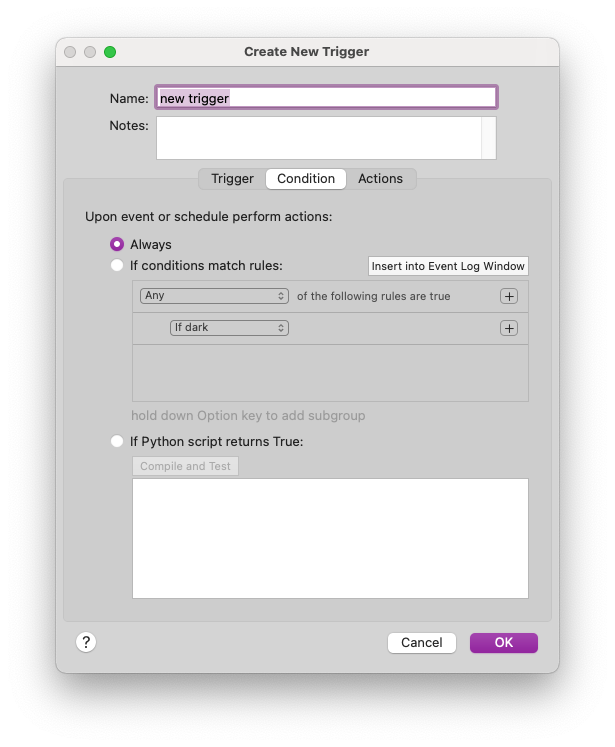
Conditions allow you to specify extra logic that's evaluated at execution time to determine if the actions associated with the trigger or schedule should be executed. Most conditions will be set to Always - in other words, there are no additional conditions associated with the trigger or schedule. However, there are many situations where you need to factor in other information at execution time that can help determine if the actions should be performed.
A simple example might be a motion sensor triggering a light - you might want motion detected by the motion sensor to turn on a light, but only between the hours of 6pm and 11pm. You can currently do that by creating a schedule that enables a trigger at 6pm and another one that disables the trigger at 11pm. But that's 3 moving parts (two schedules and the trigger). Using a condition, you can reduce that to just a single trigger and the following condition:
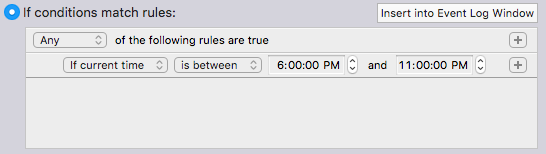
This condition says that if the current time is greater than 6pm and less than 11:00pm then the actions will be executed.
Another example that can't be accomplished easily without writing a script is having multiple conditions. For instance, let's say you have a sprinkler schedule that runs periodically. However, there are several conditions in which you don't want the sprinkler to run:
- if you've left your windows open
- if it's too cold outside
- if it has rained more than 3/4 of an inch in the last 24 hours.
Let's assume that you have a script running that populates Indigo variables with data from a weather station: "rain_total" holds the rain total for the last 24 hours, and "outside_temp" holds the temperature in Fahrenheit. Further, let's say you have a variable, "windows_open", that's either true or false indicating whether the windows in your house are open or not.
Given all of these conditions, here's how the condition editor would look:
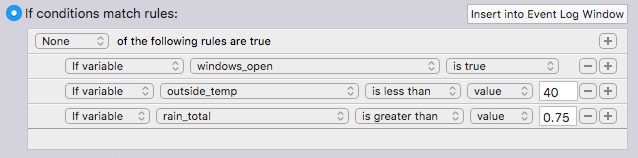
This is a negative condition - if None of the rules are true then the actions will execute. It could also be written as an All rule if you switched the tests around:
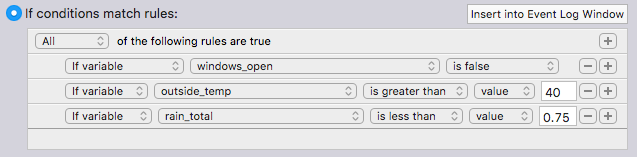
This version says that if All the conditions are true (windows aren't open, temperature is greater than 40, and rain total is less than 3/4 of an inch) the actions will execute.
Note for variable comparisons: is true will evaluate true if the value is one of these: "true", "on", "yes", and "1" and will evaluate false if it's anything else. is false will evaluate true if the value is one of these: "false", "off", "no", and "0" and will evaluate false if it's anything else.
To add a rule, click the plus (+) button next to a rule to add a rule directly below it. Click the minus (-) button to remove a rule. To create a sub-rule group, hold down the option key on your keyboard and the plus button becomes an ellipsis (…) button. Clicking on this will create a sub-rule group (Any, All, None). For instance, here's an arbitrarily complex (but nonsensical) rule with several sub-groups:
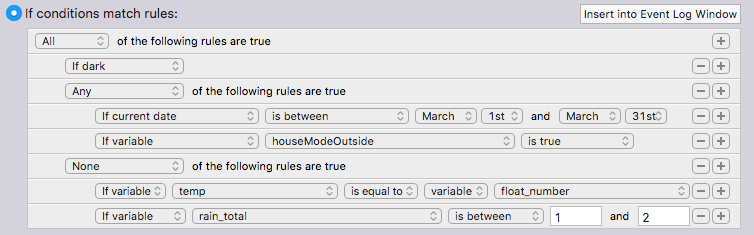
To reorder rules, simply drag them around. As you can see, the condition rule editor is extremely powerful - you can create complex multiple conditional logic without resorting to a script. And it's available to Lite users as well (whereas script conditions aren't). The Insert into Event Log Window button will put a textual representation of your rule into the event log for handy copy/paste into a forum post - this will help others see what your logic is to assist in debugging:
"All" "of the following rules are true"
    "If dark"
    "Any" "of the following rules are true"
        "If current date" "is between" 8/1 "and" 8/31
    "If variable" houseMode "is equal to" "value" "away"
    "None" "of the following rules are true"
    "If variable" test1 "is equal to" "variable" test2
    "If variable" test3 "is between" "5" "and" "10"
Condition Scripts
If, however, you still can't express your conditional logic using the rule editor, you can still select the If Python script returns True: radio button and write a Python script that programmatically returns True or False.
For example,
if [some condition evaluates as True]:
    return True  # the condition passed so your trigger or schedule will execute
else:
    return False  # the condition didn't pass so your trigger or schedule will not execute
*return False* component is optional since only a *True* return will be acted upon.
In Indigo 2025.2+, you can access the new Event Data dictionary that's passed through the chain to perform custom logic. For instance, you can create a simple condition script that will look at the event data from a Z-Wave Command Received trigger to decide if you want the actions to process or not. This is what the event_data dictionary would look like from a Z-Wave Command Received trigger:
event_data = {
  "event-indigo-id": 886317539,
  "event-plugin-event-id": "zwaveCommand",
  "event-plugin-id": "com.perceptiveautomation.indigoplugin.zwave",
  "event-plugin-name": "Z-Wave",
  "event-type": "PluginEventTrigger",
  "timestamp": "2025-07-25T17:18:25",
  "zwavecmd-device-id": 1191650674,
  "zwavecmd-node-id": 2,
  "zwavecmd-scene-id": 255
}
The script could look something like this:
# Devices that you want to continue processing
my_device_list = [1234567890, 837603829, 1191650674]
if event_data["zwavecmd-device-id"] in my_device_list:
    return True
return False
The event_data dictionary is automatically made available to your script, so you can just get the Indigo device ID out of that dict and see if it's in the list of device IDs in your condition script. If it is, it will continue processing, if not it will stop processing.