Accessing Indigo Remotely
Remote Indigo Access
After you have started the Indigo Server in client/server mode, you can remotely access it from other Macs using the Indigo Client, from your iPad, iPhone or iPod Touch using Indigo Touch, or from any modern Web browser (Safari, Firefox, Opera).
The following steps explain how to access the Indigo Server from within the local area network (LAN) of your house. Configuring your network to allow Indigo Server access from outside your home (on the other side of your router/cable modem) is more complex and will depend on your network topology, router type, and ISP features (static versus dynamic IP addresses). For this reason, we are only providing instructions on how to get local (in house) remote access to Indigo Server.
If you desire easy remote Indigo Server access from outside your home, then you will want to activate the reflector that's part of your Up-to-Date subscription. This provides secure Indigo Touch access from anywhere with no network configuration needed. As long as your Up-to-Date subscription is active you'll have remote access.
Alternatively, you can configure your network by consulting your router user manual and, if your ISP does not provide a static IP address, using a dynamic DNS mapping service like DynDNS.com. Because of the potential complexity involved in manually configuring networks and routers for this type of access, Perceptive Automation cannot provide direct support answers about router port forwarding or IP discovery issues. Users having difficulty configuring their networking hardware should post on the online support forum. Be sure and include details about the type of hardware you have and what steps you have tried.
Modifying Firewall Settings
If you are using the macOS built-in Firewall, and depending on how you have your firewall configured, you may be prompted by the firewall with the following dialogs the first time you start Indigo:
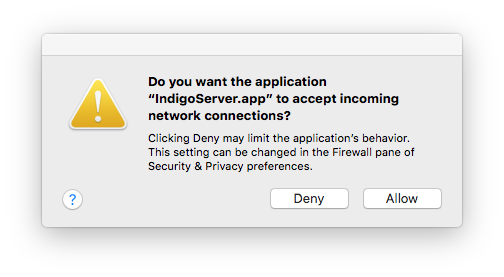
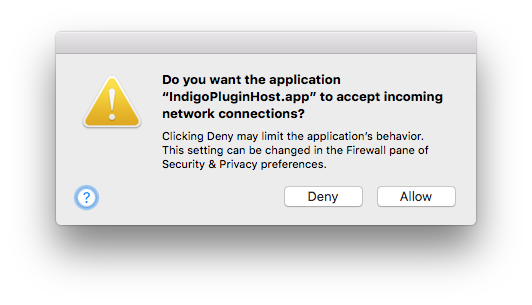
You must click the Allow button in those dialogs (if they pop up) or Indigo will not function correctly.
Discovering the Indigo Server IP Address (LAN only)
The Indigo Web Server advertises itself via Bonjour, so Indigo Touch and Safari (by clicking on the bookmarks icon, then selecting Bonjour) will automatically find any local servers. In addition to that, when connecting to a local server for the first time, Indigo Touch will also automatically fetch Reflector settings for that connection so that you'll be able to connect outside your LAN via LTE/4G/3G/Edge.
For other browsers to remotely access the Web server, we need to know the network IP address for the Mac running Indigo Server. This address will be used on the remote Mac or Web browser when connecting to the Indigo Server. By selecting the active network in the Network System Preference, you can see the IP address for your Indigo Server Mac. For WiFi, it might look something like this:
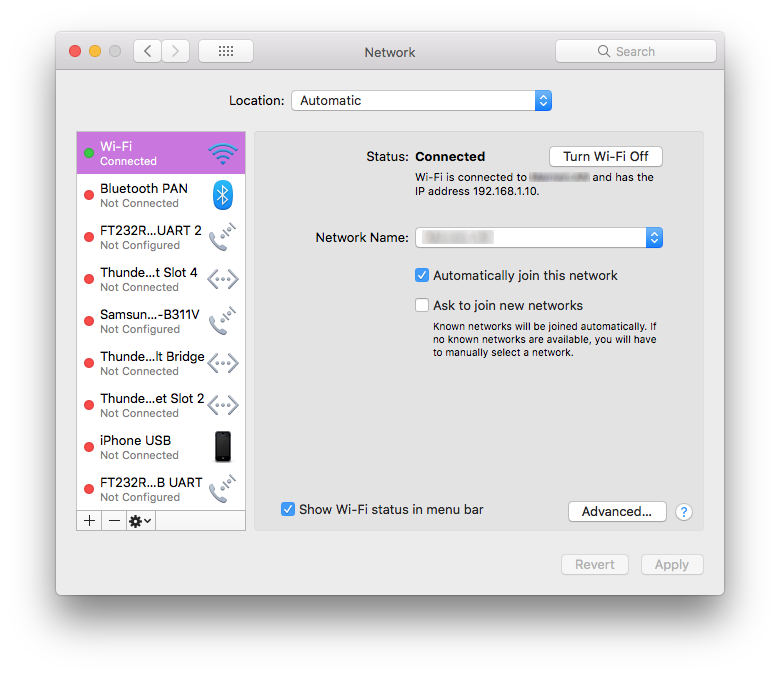
and a wired Ethernet connection might look something like this:
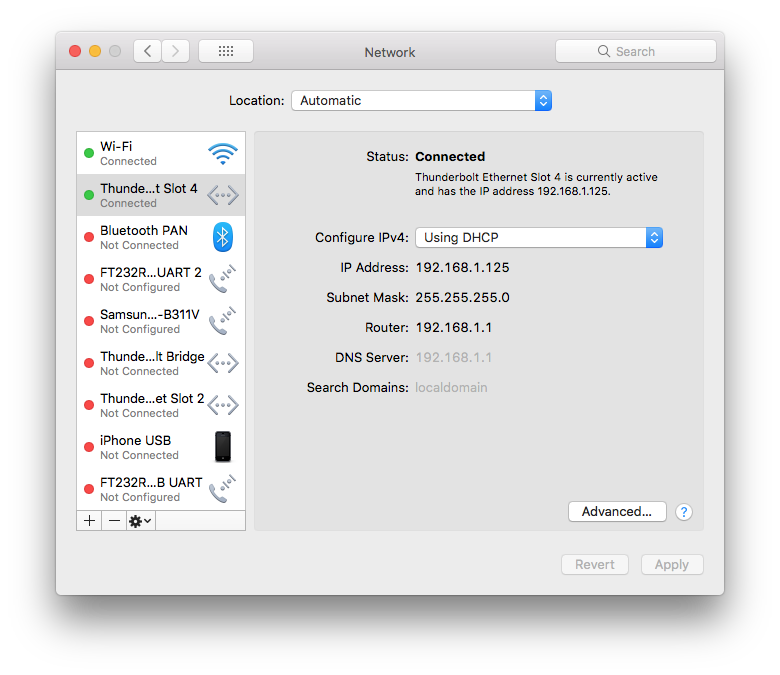
Note the IP address under the Status section.
You now have the IP address for the Mac running Indigo Server. Depending on your home network setup, this IP address may change periodically, such as when the Indigo Server Mac or router is restarted. If this happens, then you can use the steps above to discover the IP address again, or you can configure a static (not dynamic) IP address for the Mac running Indigo Server (that is an exercise left to you as it would be totally dependent on your network configuration).
Remote Access Using the Indigo Client
- If you haven't already installed the client on the remote Mac, run the Indigo Installer on the remote Mac and on the Installation Type step click the Customize button. Unselect everything except the Indigo Client line and click Install.
- Double click the
Indigo 2025.2application (inside/Applications/Indigo 2025.2.app) on the remote Mac. - If this is the first time to run Indigo on this remote Mac, then press the
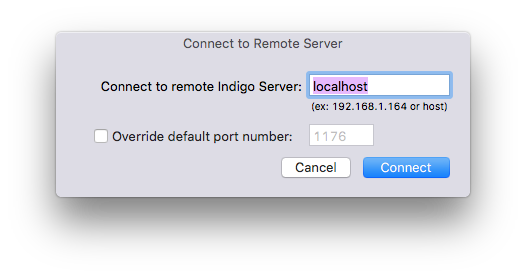
Connect to Remote Server...button in the connection status window. - If you are wanting to connect to a different Indigo Server, then select the
Indigo 2025.2->Connect to Remote Server...menu item. - Enter the
IP addressfor the Indigo Server Mac discovered in the section above. - If you overrode the Indigo Server port number (default:
1176) in the Start Local Server dialog on the server Mac, then select theOverride default port numbercheckbox and enter your custom port number. - Press the
Connectbutton.
Indigo Mac Client and the Indigo Reflector
The Indigo Mac Client doesn't use the Indigo Reflector service. Connecting an Indigo Mac Client to a server over the internet is a complex topic that is well beyond this document – we suggest you search our online forums for others that have configured this type of access.
Remote Access Using Indigo Touch
Indigo Touch, the iPhone and iPod Touch application from Indigo Domotics, allows the user to view and control Devices, activate Action Groups, view Variables, and access custom Control Pages. One of the best features of Indigo Touch is its ability to automatically detect and configure network connections. If your iPhone (or iPod Touch) is connected to your local wireless LAN, then it should automatically discover your server. In Indigo Touch, tap the Settings button. You should see the name of your Database in the list. Tap on it, and it will connect (it will ask for your username/password if you have one set, but it will remember it going forward so you won't have to type it in again).
At this point, Indigo Touch will also query the server to see if you have an Indigo Reflector set up for the server. This makes connecting to your home server via Indigo Touch completely seamless. If you have a reflector set up and running, then Indigo Touch will automatically attempt to connect no matter where you are or how you're connected. If you're local, it will use the local WiFi network, if you're on a remote WiFi network, it will attempt to use the reflector account. If you're iPhone is on LTE/4G/3G/Edge, it will also attempt to connect via your reflector account. This makes Indigo Touch truly location agnostic!
You can, however, configure a connection manually. Simply tap Manually Add Server on the Settings screen in Indigo Touch and you can enter your host/ip address and port number.
Remote Access Using a Web Browser
Indigo, when run in client/server mode, will automatically start its built-in Web server on launch. This allows access from remote Macs, PCs, and other internet devices like the iOS devices, Android devices, etc. Any device that can run a modern Web browser (Safari, Chrome, Firefox) will work.
To access the Indigo Web Server use the IP address you discovered in the section above along with the Indigo Web Server port number (default: 8176). The URL will look like this (substitute your server's correct IP address):
http://192.168.1.23:8176/
See the using Control Pages section for information on how to create custom browser accessible interface pages.
Indigo Touch and Your Reflector
Indigo Touch for iOS is transparently integrated with the Indigo Reflector service. When you use your iOS device (iPhone, iPad, etc.) to connect to Indigo while in your house (and on your local Wi-Fi network), Indigo Touch will automatically retrieve and remember your reflector address. You can press the settings (gear) icon on the top toolbar then find the Reflector item near the bottom to verify that it is working correctly.
Once Indigo automatically detects your reflector address, it will seamlessly change between using the local Bonjour detected address and the remote reflector address. Just launch Indigo Touch and it works, no matter where you are!
Reset Your Reflector's Activation
If you are switching to a different reflector that you've asked us to create for you, or you've been instructed by support to reset your current reflector's activation, then follow these steps:
- Shut down the Indigo Server (select
Indigo 2025.2->Stop Server) but don't quit the Indigo Client - Switch to your browser and log out of your Indigo Account
- Go to the reflector list in your Indigo Account (you'll need to log back in) and click the
Resetlink beside your reflector's status (it should say Activated before your press Reset) - Switch back to the Indigo Client and click on the
Start Local Serverbutton
You should now see an Activate Reflector button towards the bottom of the dialog. Click that, log in to your reflector account, and select the appropriate reflector. If the reflector you want to use doesn't show in the list of inactive reflectors, contact us with the name of the reflector you're trying to activate and what steps you've performed.
Manual Reset
If the procedure above doesn't work, and only if instructed by support, follow these steps to manually reset your Indigo Client reflector settings:
- Shut down the Indigo Server (select
Indigo 2025.2->Stop Server) but don't quit the Indigo Client - Switch to your browser and log out of your Indigo Account
- Go to the reflector list in your Indigo Account (you'll need to log back in) and click the
Resetlink beside your reflector's status (it should say Activated before your press Reset). If the reflector has already been deactivated that is fine – just skip this step. - In the Finder, select
Go->Go to Folder… - In the resulting dialog, copy and paste the following:
/Library/Application Support/Perceptive Automation/Indigo 2025.2/Preferences/ - In the resulting Finder window, delete the folder named
PrismReflector - Switch back to the Indigo Client and click on the
Start Local Serverbutton