Installation & Server Setup
Installing Indigo
Indigo can run as a standalone application on a single Mac or can be run in a client/server mode on two or more Macs. In either case, you must first run the Indigo installer on the main Mac (also referred to as the server Mac) to which the home automation interface hardware (Z-Stick, PowerLinc, CM15, etc.) will be connected. Just download the latest Indigo installer (you must be logged in to your Indigo Account to see the downloads available to you). This should download the disk image. In Safari, click the downloads button (the down arrow to the right of the URL/search bar). You should see an entry titled "Indigo.dmg". Double-click the installer file to switch to the Finder. A dialog will show the disk image is being mounted. Once it's mounted, a window will open with the following files:
- A ReadMe.html file - read this for any late breaking information about Indigo or the installation process.
- The Indigo Installer.pkg file - double-click this to start the Indigo installation. Follow the instructions provided by the installer. On the Installation Type screen, press the Install button (do not use Customize) to install all the Indigo packages (Server, Server Scripts, Drivers, and Client) on your designated hard drive. Note: you must install and run Indigo from an account on your Mac that has administrator privileges.
Location of Indigo Files after Installation
The Indigo 2025.2 application can be found here:
/Applications/Indigo 2025.2.app
And the Indigo database files, log files, scripts files, and other settings/support files are stored in:
/Library/Application Support/Perceptive Automation/Indigo 2025.2/
By default, database files are stored in the Databases folder in that folder.
Note
This is the Library folder at the top level of your hard drive, not the one in your User folder. Lion and greater hide these folders by default, but if you select the Go->Go to Folder… menu item in the Finder and paste in the path above it will open that folder in a Finder window.
Installing Indigo Client on another Mac (optional)
If you have only a single Mac, then your installation is now complete and you are ready to start Indigo. However, Indigo has been designed as a client/server application to allow remote control and configuration from anywhere (*extra network configuration is required if you want to access your server from a client over the Internet and is outside the scope of this manual - post on the online support forum for assistance). The client-only installation process installs only the files needed to remotely access the primary Indigo server running on your main Mac.
- Copy the Indigo Installer.mpkg file to your other Mac.
- Double click the Indigo Installer.mpkg icon to start the Indigo installation.
- Follow the instructions provided by the installer process. On the Installation Type screen, press the Customize button and then deselect all the package options (Indigo Server, Indigo Plugins, Indigo Server Scripts, Indigo Drivers) except for the Indigo Client package.
- Press the Install button to install just the Indigo Client package.
- Note: It is not necessary to restart your Mac after installing the Indigo Client package only.
If you have other Macs on your home network, then you can optionally repeat the above Indigo Client installation on each of them.
Now you can start Indigo and configure the server, and then remotely control Indigo from your iPad, iPhone or iPod Touch using Indigo Touch, a Web browser or the Indigo Client.
Repairing an Installation
If you experience issues with your Indigo installation, such as file permissions or missing or corrupt python modules, you can attempt to repair those by rerunning the Indigo installer. This will reinstall the Indigo application and all of its dependencies but it will not touch your Indigo database, plugin preferences, or scripts you've added to the shared directories. This is the standard way to get Indigo back to it's installed state.
Starting Indigo Server
Indigo can run as a standalone application or can be run in a client/server mode. The latter allows the server to run invisibly in the background without the client application UI showing and is the recommended option. Regardless of which you are doing, the first step after installation is to launch Indigo and configure the local server.
- Double click the
Indigo 2025.2application (/Applications/Indigo 2025.2.app). - If this is the first time to run
Indigo 2025.2on this Mac, then press theStart Local Server...button in the connection status window. - If you want to reconfigure the Indigo Server on a Mac already running Indigo, then select the
Indigo 2025.2->Start Local Server...menu item.
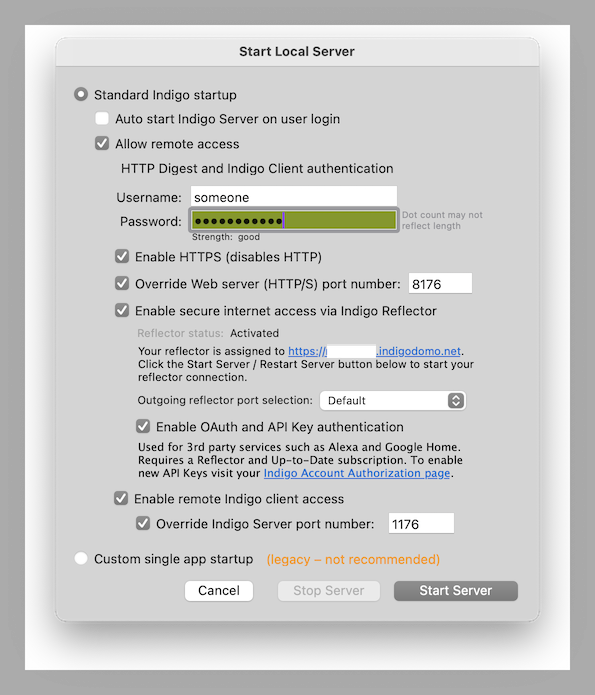
Password Field Behavior
The length of the entry in the password field does not reflect the length of the actual password entered. This is intentional and is meant to add a layer of security so a bad actor can't guess the true password's length.
Standard startup mode
Choose the Standard Indigo Startup radio button to start the Indigo Server process independently of the Indigo Client. This will allow the server to run in the background on your Mac with no visible UI, even when the Indigo Client is not running. This will also start the built-in Web server, allowing remote access from Web browsers on other computers and remote access from iPhones and iPod Touches.
Use the Auto start Indigo Server on user login checkbox to have the Indigo Server automatically launched whenever your current OS X administrator user account is logged in. This option will also make sure the Indigo Server process is automatically relaunched if it crashes.
Use the Allow remote access checkbox to enable remote access from other Macs and Web browsers. You must enter a username and password if you enable remote access.
Use the Override Web server port number: checkbox to change the TCP/IP port number that the web server uses to serve content and browsers will use to browse the web control pages.
Use the Enable secure internet access via Indigo Reflector checkbox for secure Web browser access from anywhere. This option requires a you to have configured a Reflector, which handles maintaining the secure connection to Indigo Server automatically. Reflectors are included as part of your Up-to-Date subscription.
Outgoing reflector port selection: Some ISPs, especially satellite providers, may block incoming and outgoing connections -- particularly if they sit idle for a time (which, in our opinion is ridiculous) -- this setting provides a few options to hopefully work around these limitations. The setting you choose does not have any impact on performance. Further, the reflector port selection (or, in fact, the reflector itself) should have no impact on local web traffic performance (since the reflector isn't involved when a local network connection is made). If you're experiencing slowness with a local connection, check your router to ensure it isn't blocking or otherwise interfering with Bonjour traffic.
Use the Enable OAuth and API Key authentication checkbox to enable 3rd party services like Alexa. It also will allow REST API calls to use an API key for authentication rather than a username/password. This is more secure since you can revoke a key if it gets compromised without having to change passwords in wherever you may need to use them.
Use the Enable remote Indigo client access checkbox to allow remote Indigo Clients on other Macs to connect to the Indigo Server. Note that this only works on your local network - the Indigo Reflector service is only for Indigo Touch and other web access, not for configuration client connections.
Use the Override Indigo server port number: checkbox to change the TCP/IP port number that the Mac OS X client uses to connect to the server.
Custom single app startup
This is a legacy setting and should only be used if instructed by Indigo Customer Support.
Starting the Server
Press the Start Server button, or the Restart Server button if the server is already running, to start the local Indigo Server. If Allow remote access is enabled, then the built-in Web server will also be started.
The Indigo Client will automatically connect to the Indigo Server. If this is the first time to launch the Indigo Server on this Mac, then you will be prompted to accept the License Agreement and to enter your Registration Code. The Indigo Client will then load and display the current house database file.
If you are running in client/server mode, then you can quit the Indigo Client at anytime and the Indigo Server will continue to run in the background processing your home control logic and schedules. Additionally, you can remotely access the Indigo Server from Indigo Clients on other Macs or from remote Web browsers that have internet access to the server Mac.
If you are running in standalone mode, then quitting the Indigo Client will automatically quit the Indigo Server.
If this is the first time you've started the server, you'll be prompted first to click through our End User License Agreement (EULA), then you'll see the Indigo Account Log In dialog:
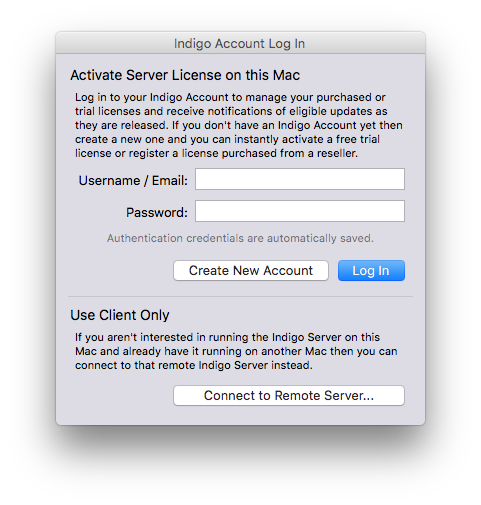
and enter your Indigo Account username (or email) and password. The server will then continue to start up.
If you purchased a retail license from a reseller, you must follow the directions supplied by your reseller. It may be in an email or they may include a printed sheet with your shipment. Usually this will just tell you to create a new Indigo Account (click the Create New Account button) and fill out the form.
If you just want to run the client and connect to a server on a different Mac, then click the Connect to Remote Server... button.
Backing Up Indigo
Backing up your Indigo installation is very simple: just make sure that your backup program is backing up this folder:
/Library/Application Support/Perceptive Automation/
Note: this is the Library folder at the top level of your hard drive, not the one in your User folder. Use the Go->Go to Folder... menu item in the Finder and paste in the path above to get there easily). Another thing to note is that it's possible that you've stored your database in a non-standard location, like for instance the Documents folder in the home folder for the account under which Indigo is installed. If that's the case you'll need to make sure that you've backed it up as well. You can tell the location of your database file by Command-clicking the database name in the title bar of the Home Window.
Time Machine will do this by default. To recover, just recover that directory and then run the Indigo 2025.2 installer again (which will repair any permission issues that Time Machine may have introduced).
General Configuration Settings
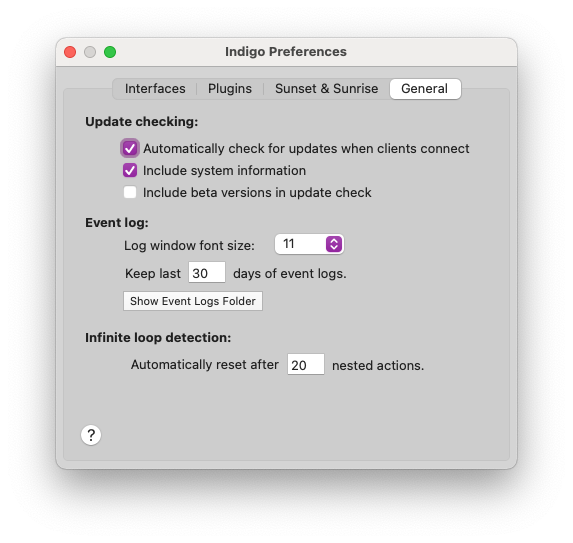
You can configure other Indigo settings by opening the preferences dialog (selecting the Indigo 2025.2->Preferences... menu item) and clicking on the General tab.
The first section of the tab is about update checking. The first checkbox will have the client check with our servers to see if there's an update to Indigo available when the client first starts up. If there is, it will let you know. The second checkbox will send anonymous information to us (and it really is anonymous) about your install - this helps us to better prioritize what future enhancements to add. The last checkbox will also check to see if there's a newer beta version available - if you aren't interested in getting betas then leave it unchecked.
You can have Indigo check for updates immediately by selecting the Indigo 2025.2->Check for Updates... menu item.
The next section we talked about above - how many days of event log files to keep.
The last section is a rather technical configuration parameter - it is possible to get into an unending (infinite) loop when you're setting up your triggers. For instance, if you have a trigger the fires on a variable change, and it changes the variable to some new value each time, that would cause the trigger to fire again. Setting this value will cause it to stop eventually. Leaving it set to 5 is probably the best idea.
Specifying your Latitude and Longitude
Indigo uses your current Latitude and Longitude coordinates to calculate precisely when sunset and sunrise will occur every day. Indigo automatically extracts your location from the System Preferences. To do this, it must have access to Location Services on your Mac (and WiFi must be turned on for Location Services to work). When Indigo first launches, you'll be prompted to allow access to Location data. If for some reason it's not working, check the Location Services section on the Privacy tab of the Security & Privacy section of your System Preferences and make sure that IndigoServer is enabled (has a checkbox beside it).
Configuring your System Location
- Choose
System Preferencesfrom theApplemenu. - Select the
Date & Timeicon. - Select the
Time Zonepanel. - If the current
Closet Citylocation is not near your location, then follow the instructions on the panel to choose your location. If you would like to precisely specify your location, then you can override the system location from within Indigo.
Overriding the System Location
By default, Indigo will use Location Services to determine the location of your Mac. You will be asked the first time you start your server to grant permission for IndigoServer to access you Mac's location. If Indigo doesn't seem to be running schedules at the right time, make sure that Indigo is authorized to access Location Services. Open the System Preferences, select the Security & Privacy preference, click on the Privacy tab and you should see IndigoServer in the list - make sure the check box beside it is enabled:
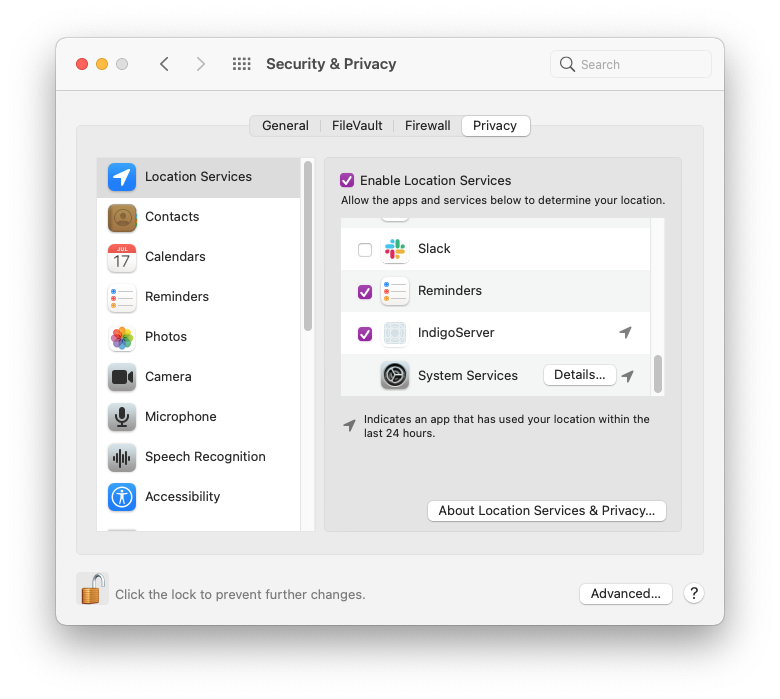
You can, however, manually specify the latitude and longitude:
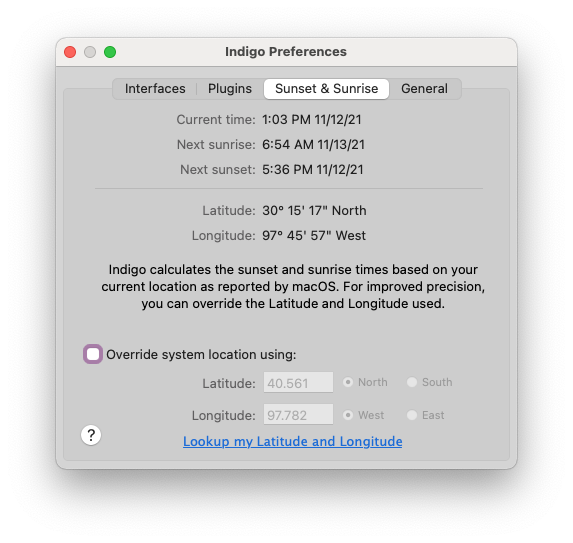
- Choose the
Indigo 2025.2->Preferences...menu item, then make sure theSunset & Sunrisetab is selected. - Select the
Override system locationcheckbox. - Enter your exact
LatitudeandLongitudecoordinates.
Modifying System Settings for Continuous Operation
Indigo requires your Mac to be on and awake for processing. You can, however, set the display to go to sleep: the Indigo Server will not need the display to be active to function.
Modify Energy Saver Settings to Prevent Computer Sleep
- Choose
System Preferencesfrom theApplemenu. - Select the
Energy Savericon. - Move the
Computer sleep:slider toNever. - Uncheck
Put the hard disk(s) to sleep when possible. - Select the
Start up automatically after a power failurecheckbox.