Devices.xml
One of the main components that a server plugin can define is a device. In Indigo, devices are the primary objects that users deal with. Lights, thermostats, sprinklers, I/O devices are all examples of device types. One of the biggest requests we get is to support the [name your favorite device]. Obviously, we can’t keep up, so the server plugin architecture was designed to allow you to add device support to Indigo.
The root element in the Devices.xml file is Devices. Contained in the Devices element are an unlimited number of Device elements that define the device types that your plugin will define. Each Device will contain a ConfigUI element to collect the specific configuration information for a device (note that you don’t need to include name, description, or typeId from the user - Indigo will collect those for you). Here are the specific attributes and elements that can be defined in a Device element:
Device Types
| Name | Type | Required | Notes |
|---|---|---|---|
type |
Attribute | Yes | This must be one of: dimmer, relay, sensor, speedcontrol, thermostat, or custom. We’ll discuss each below. |
id |
Attribute | Yes | This is your plugins unique identifier for this device type. It must be unique in this plugin. |
subType |
Attribute | No | This must be one of: kDimmerDeviceSubType, kRelayDeviceSubType, kSensorDeviceSubType. We’ll discuss each below. There are also several device SubType examples in the SDK. |
allowUserCreation |
Attribute | No | If set, the value must either be true or false (defaults to true). This attribute is discussed in more detail below. |
Name |
Element | Yes | This is the name of the device type that users will see when selecting the type in the Devices dialog. |
ConfigUI |
Element | No | This is the custom UI for configuring the device. It’s optional, but in reality we can’t envision a device that needs no configuration. If the optional <ConfigUi> element is not used, the "Edit Device Settings…" button will be displayed, but disabled. You'll also need to manually set dev.configured = True and then dev.replaceOnServer() for the change to take effect. |
States |
Element | No | This element is used to describe the possible states for the device. For custom devices it is all available states. For subclassed devices it will describe any additional states for the device. See the description below for more details. |
<?xml version="1.0"?>
    <Device type="sensor" id="my_temp_sensor">
        <Name>Example Temperature Sensor Module</Name>
        <ConfigUI>
            <Field id="address" type="textfield" defaultValue="123">
                <Label>Module Address:</Label>
            </Field>
        </ConfigUI>
        <States>
            <State id="temperature">
                <ValueType>Integer</ValueType>
                <TriggerLabel>Temperature</TriggerLabel>
                <ControlPageLabel>Temperature</ControlPageLabel>
            </State>
        </States>
    </Device>
Device Subtypes
| Category | SubType | Attribute(s) | Notes |
|---|---|---|---|
| Device | kDeviceSubType |
Amplifier, Automobile, Camera, Keypad, Mobile, Remote, Robot, Security, Speaker, Streaming, Television, Weather, Other | For example, indigo.kDeviceSubType.Amplifier |
| Dimmer | kDimmerDeviceSubType |
Blind, Bulb, ColorBulb, ColorDimmer, Dimmer, Fan, InLine, Outlet, Plugin, Value | For example, indigo.kDimmerDeviceSubType.Dimmer |
| Relay | kRelayDeviceSubType |
DoorBell, DoorController, GarageController, InLine, Lock, Outlet, Plugin, Siren, Switch | For example, indigo.kRelayDeviceSubType.Switch |
| Sensor | kSensorDeviceSubType |
Analog, Binary, CO, DoorWindow, GasLeak, GlassBreak, Humidity, Illuminance, Motion, Presence, Pressure, Smoke, Tamper, Temperature, UV, Vibration, Voltage, WaterLeak, Zone | For example, indigo.kSensorDeviceSubType.Temperature |
Note
There are no device subtypes for other built-in devices at this time.
In Devices.xml
<Device type="sensor" subType="kSensorDeviceSubType.Temperature" id="my_temp_sensor">

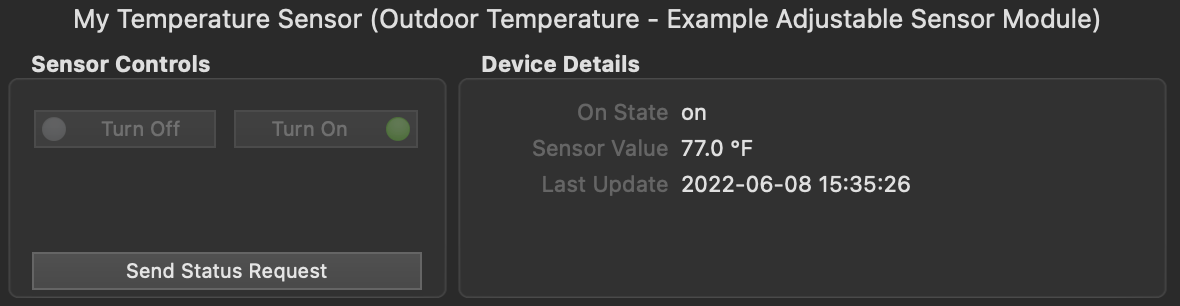
<Device type="sensor" subType="kSensorDeviceSubType.Temperature, ui=Outdoor Temperature" id="my_temp_sensor">
    <Name>Example Adjustable Sensor Module</Name>
...
In Python:
newdev = indigo.device.create(indigo.kRelayDeviceSubType.Plugin, deviceTypeId="Device1")
newdev.model = "Device 1 Model"
newdev.subModel = "Sub Model 1"
newdev.name = u"Device 1"
To get information on the device group:
When the allowUserCreation attribute is present and set to false, Indigo will not display the device model type when the user elects to create a new device (the "Model" dropdown will not contain the device type). This is especially useful for complex devices that have multiple subtypes that are set programmatically (but not created using the Device Factory approach). Your plugin may not support individual subtypes as stand-alone devices and, therefore, you wouldn't want users to be able to create them. The allowUserCreation attribute was introduced with Indigo version 2022.1.2 and API 3.1.
<Device type="sensor" subType="kSensorDeviceSubType.Temperature, ui=Outdoor Temperature" id="my_temp_sensor", allowUserCreation="false">
Check out the SDK for example plugins of each type of device listed above. The examples show config dialogs, required method stubs, etc., to implement the respective device types.
Important
Plugin developers should account for each devices' callbacks when implementing built-in device types -- even if you don't use all the callbacks within your plugin. For example, if your plugin implements the Speed Control device type, your plugin should include handlers for all the Speed Control callbacks -- such as turnOn, turnOff, or toggle. This is very important because these callbacks will still be exposed in the Indigo Client UI for things like Actions and Triggers. It's best to give users an indication that the callback won't do anything in your plugin by writing a warning to the Event log. Consult the SDK for more information on each device types' callbacks and examples of how to handle them.
Custom Device Type
The custom device type is special because it’s completely custom. Therefore, you must specify everything about the device - it’s states and their types (Number, String, List (enumeration), Boolean). So, here’s a simple example of the <States> element of a custom device, in this case a thermostat:
<States>
    <State id="temperature">
        <ValueType>Number</ValueType>
        <TriggerLabel>Temperature</TriggerLabel>
        <ControlPageLabel>Temperature</ControlPageLabel>
    </State>
    <State id="heatSetPoint">
        <ValueType>Number</ValueType>
        <TriggerLabel>Heat Setpoint</TriggerLabel>
        <ControlPageLabel>Heat Setpoint</ControlPageLabel>
    </State>
    <State id="coolSetPoint">
        <ValueType>Number</ValueType>
        <TriggerLabel>Cool Setpoint</TriggerLabel>
        <ControlPageLabel>Cool Setpoint</ControlPageLabel>
    </State>
    <State id="mode">
        <ValueType>
            <List>
                <Option value="off">Off</Option>
                <Option value="heatOn">Heat On</Option>
                <Option value="coolOn">Cool On</Option>
                <Option value="heatCoolOn">Heat and Cool On</Option>
            </List>
        </ValueType>
        <TriggerLabel>Operation Mode Changed</TriggerLabel>
        <TriggerLabelPrefix>Mode Changed to</TriggerLabelPrefix>
        <ControlPageLabel>Current Mode</ControlPageLabel>
        <ControlPageLabelPrefix>Mode is</ControlPageLabelPrefix>
    </State>
</States>
Each State listed in the States element will be available in various parts of the UI, including the "Device State Changed" Event dialog.
Attributes
The State element has several attributes and elements that should be defined:
| Attribute | Type | Required | Notes |
|---|---|---|---|
id |
Attribute | Yes | This is a unique identifier for this State within the context of this Device element. IDs must follow the XML standard in terms of construction with one addition: they may not include periods ('.') - periods are reserved for internal use only. |
readonly |
Attribute | No | If you want this state to be read only, set this attribute to "YES". For instance, as in this example, the temperature the thermostat is sensing isn’t user settable. (Currently unused but it may be used in the future) |
ValueType |
Element | Yes | This is the type of the state, which must be one of the following: Boolean, Number, List (enumeration constructed just like the <List> element of a <Field> as described above), String, and Separator (used only to visually group your states in the various popups). The <ValueType> element may also have an optional attribute if the value is Boolean//: boolType can be: "TrueFalse" (default), "OnOff", "YesNo", and "OneZero". Example: <ValueType boolType="OnOff">Boolean</ValueType>// |
TriggerLabel |
Element | Yes | When selecting "Device State Changed" type trigger events, you can select your device in the resulting list. A popup below the device will list all of your States using this text. |
TriggerLabelPrefix |
Element | No | When defining an enumeration, trigger change label is usually going to need to be a bit different than just the trigger label ("Mode Changed to Heat" vs "Operation Mode Changed" - the former is to test a specific change, the latter will trigger on any change). To accomplish this, you can specify a prefix that’s prepended to the actual state value (with a space in between). See the example above. |
ControlPageLabel |
Element | Yes | In the Control Page Editor, when selecting "Device State" as the display type, then select your device, the next popup will show all your states using this text. |
ControlPageLabelPrefix |
Element | No | When defining an enumeration, the control page label is usually going to need to be a bit different ("Mode is Heat" vs "Current Mode" - the former will show whether a the state is true, the latter shows the state value). You can specify a prefix that’s prepended to the actual state value (with a space in between). See the example above. |
The ValueType element is particularly important - it controls what types of controls are presented to the user in the UI: an integer tells it to show greater than, less than, equal to, not equal to, etc. and a way to enter a number (in the case of a trigger).
See the States section of the Devices Class page for details on how to set states once the IndigoServer understands the structure of your device's states.
Device Factory
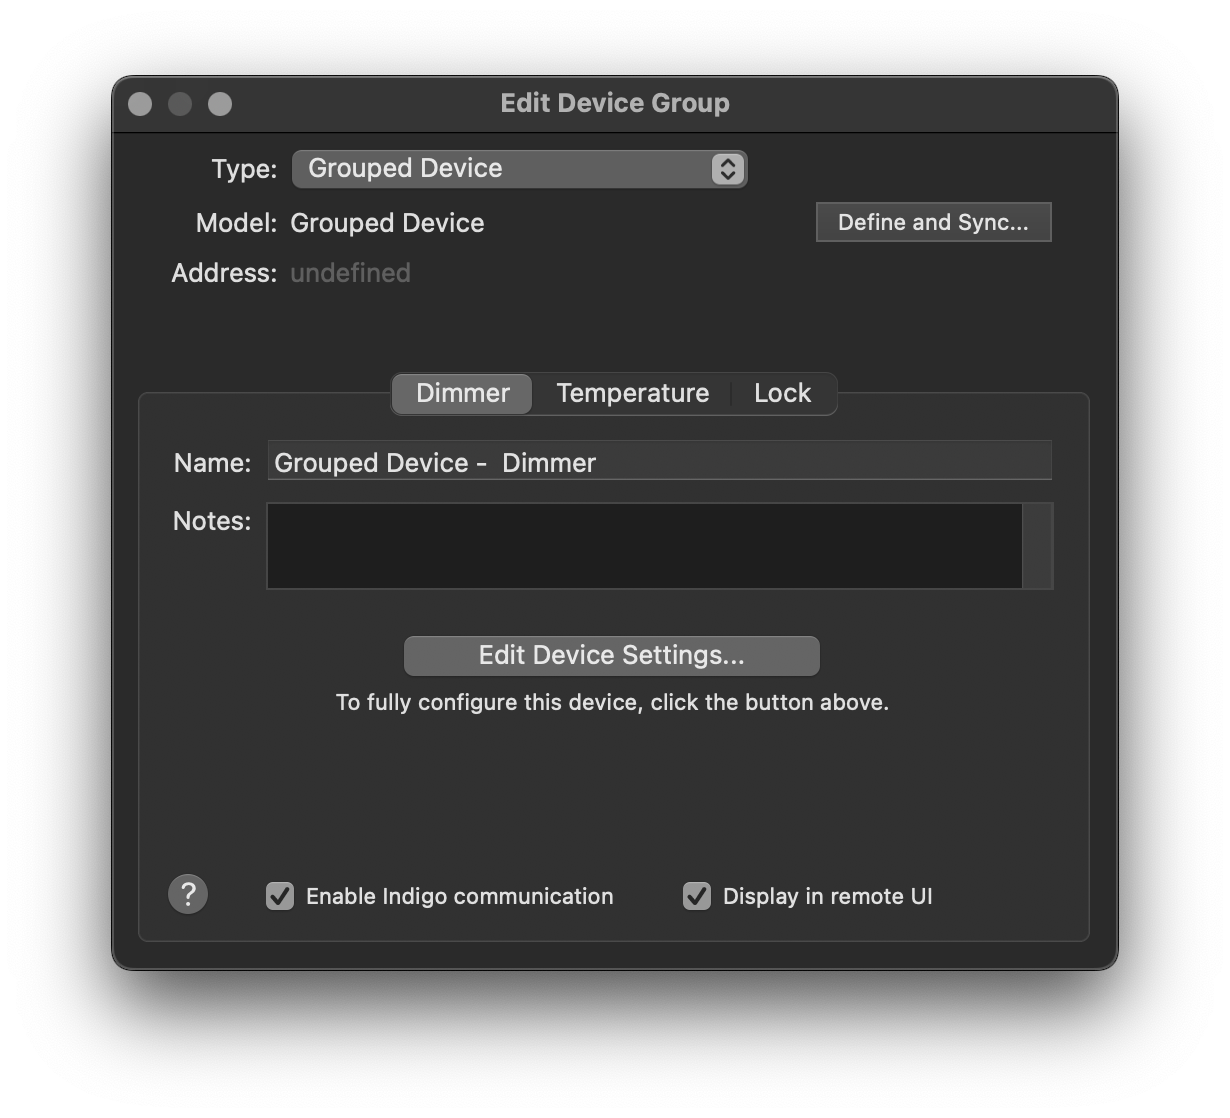
One way to create "multifunction" devices is to use Indigo's Device Factory method. Device Factory devices are defined by using a special <DeviceFactory> node in Devices.xml. A basic Device Factory device definition would look something like this:
<DeviceFactory>
    <Name>Device Factory Plugin Device Group</Name>
    <ButtonTitle>Create</ButtonTitle>
    <!-- A configUI is required for the device factory element. -->
    <ConfigUI>
        <Field id="label" type="label">
            <Label>You are not required to have settings here, but a configUI node is required. These will be stored in self.pluginPrefs and will apply to all grouped devices created with the plugin.</Label>
        </Field>
        <Field id="name" type="textfield">
            <Label>Name:</Label>
        </Field>
    </ConfigUI>
</DeviceFactory>
Note that when the <Device Factory> node is present, devices that include the subType attribute will not be presented to the user as individual device types when they elect to create a new plugin device (it's not possible to have a Device Factory implementation and individual plugin device definitions together). You define sub-devices like any other device type, with the addition of the subType attribute:
<DeviceFactory>
    <Name>Plugin Device Group</Name>
    <ButtonTitle>Create</ButtonTitle>
    <!-- A configUI is required for the device factory element. -->
    <ConfigUI>
        <Field id="label" type="label">
            <Label>You are not required to have settings here, but a configUI is required. These will be stored in self.pluginPrefs and will apply to all grouped devices created with the plugin.</Label>
        </Field>
        <Field id="name" type="textfield">
            <Label>Name:</Label>
        </Field>
    </ConfigUI>
</DeviceFactory>

<Device type="dimmer" id="my_dimmer_device" subType="kDimmerDeviceSubType.Dimmer" ui="Dimmer">
<!-- Note that devices can have their own configUIs -->
    <Name>Example Dimmer Module</Name>
    <ConfigUI>
        <Field id="label" type="label">
            <Label>You are not required to have a config UI for each individual device, however, creating a settings UI allows for settings that apply only to that group (when more than one grouped device is desired). These will be stored in dev.pluginProps.</Label>
        </Field>
        <Field id="name" type="textfield" hidden="false">
            <Label>Name:</Label>
        </Field>
        <Field id="setting" type="textfield" hidden="false">
            <Label>Setting:</Label>
        </Field>
    </ConfigUI>
    <States>
        <State id="state">
            <ValueType>String</ValueType>
            <TriggerLabel>State</TriggerLabel>
            <ControlPageLabel>State</ControlPageLabel>
        </State>
    </States>
</Device>

<Device type="sensor" id="my_sensor_device" subType="kSensorDeviceSubType.Temperature" ui="Outdoor Temperature">
    <Name>Example Adjustable Sensor Module</Name>
    <States>
        <State id="state">
            <ValueType>String</ValueType>
            <TriggerLabel>State</TriggerLabel>
            <ControlPageLabel>State</ControlPageLabel>
        </State>
    </States>
</Device>

<Device type="relay" id="my_lock_device" subType="kRelayDeviceSubType.Lock" ui="Lock">
    <Name>Example Lock Module</Name>
    <States>
        <State id="state">
            <ValueType>String</ValueType>
            <TriggerLabel>State</TriggerLabel>
            <ControlPageLabel>State</ControlPageLabel>
        </State>
    </States>
</Device>
Once the device definitions have been established, you can use your plugin code to create the device group. This function can be called from the validate_device_factory_ui()or closed_device_factory_ui() methods.
def create_the_device_group(self, my_name):
    """
    Convenience method for device creation. This could also be done in closed_device_factory_ui() for example. Note
    that some device props are read only even when you create them from scratch (i.e., dev.version) and some will
    be ignored if you try to set them (i.e., dev.description, dev.errorState).

    Note that `protocol`, `name` and `deviceTypeId` are all required with the `indigo.device.create()` method call.
    """
    self.debugLog("create_the_device_group called")

    # Create the first device in the group. Note that the ''deviceTypeId'' value matches the ''id'' we used in our ''Devices.xml'' definition.
    new_dev = indigo.device.create(protocol=indigo.kProtocol.Plugin, name=my_name, deviceTypeId="my_dimmer_device")
    new_dev.model = "Grouped Device"
    new_dev.subModel = "Dimmer"
    new_dev.name = f"{my_name} Dimmer"
    new_dev.replaceOnServer()

    # Add the group my_name setting to the props of device 1 for later use.
    new_props = new_dev.pluginProps
    new_props['name'] = my_name
    new_dev.replacePluginPropsOnServer(new_props)

    # Create the second device in the group. You can also add a state value here if desired.
    new_dev = indigo.device.create(protocol=indigo.kProtocol.Plugin, name=my_name, deviceTypeId="my_sensor_device")
    new_dev.model = "Grouped Device"
    new_dev.subModel = "Temperature"
    new_dev.name = f"{my_name} Temperature"
    new_dev.replaceOnServer()
    new_dev.updateStateOnServer('state', value="Some value.")

    # You can also create devices that don't have corresponding device parameters established in Devices.xml.
    new_dev = indigo.device.create(protocol=indigo.kProtocol.Plugin, name=my_name, deviceTypeId="my_lock_device")
    new_dev.model = "Grouped Device"
    new_dev.subModel = "Lock"
    new_dev.name = f"{my_name} Lock"
    new_dev.replaceOnServer()
Important
You are responsible for catching all the mandatory methods for the devices you create. The Device Factory method does not create them for you.
For another option to create Device Factory devices, check out the example in the Indigo SDK.