Indigo Plugin Developer's Guide v2.0
In this guide
Introduction to the Indigo plugin bundle format: the required Info.plist keys, folder structure (Server Plugin, Resources, Packages, Menu Items), and how the Indigo Plugin Host (IPH) sandboxes and manages each plugin process. Start here before reading the XML Reference or the implementation reference for plugin.py.
Indigo Plugins and APIs
Indigo has a long history of extensibility - AppleScript Attachment scripts were available from the start (and deprecated in Indigo 7.4). Later, the Indigo Web Server (IWS) was added along with the IWS plugin and the ability to add custom images.
With Indigo 5.0, we added a new server plugin API that allows 3rd party developers to more natively add devices, triggers, and actions to Indigo. This server API allows users and 3rd party vendors to implement their own functionality in Python with full access to all the objects and events that Indigo understands (referred to as the Indigo Object Model, or IOM). Someone with sufficient skills can implement support for any kind of device and have them integrated into the Indigo UI as first-class citizens.
To deliver this additional functionality, we created the Indigo plugin bundle. Let’s start by first looking at the Application Support folder structure which the Indigo installer creates.
A note about version numbers: We increment the API version number when the API is revised. The major number (X.0) is incremented when we do something that will break backwards compatibility. The minor number (1.X) is incremented when we add new features. See the API version chart to see which API versions were released in which Indigo version. If any of the API tables in the documentation don't have a version number you can assume that the feature is available in API version 1.0 and later.
Indigo Support Folder Structure
Indigo's folder structure looks like this:
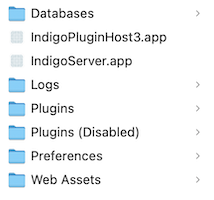
in this location:
/Library/Application Support/Perceptive Automation/Indigo [VERSION])
]
You'll notice these two folders in particular: Plugins and *Plugins (Disabled)*. These two folders are where the plugin bundles are stored (see the next section for details). Plugins that are enabled from the UI are located in the Plugins folder and when a user disables a plugin it’s moved to the *Plugins (Disabled)* folder.
The Indigo Plugin Bundle
We created a macOS Finder bundle type, the Indigo plugin bundle (.indigoPlugin), which has a very specific structure to encapsulate everything that a plugin needs to perform its functions:
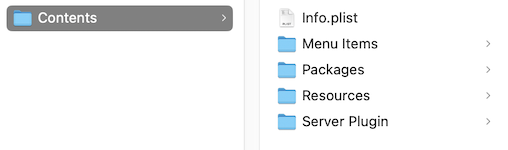
The first thing you’ll notice is that this is actually a real Finder bundle - so it appears to be a single file called Example.indigoPlugin. It’s moved around and treated as a single file, and all the user has to do to install your solution is to double-click it in the Finder and Indigo will install and enable it for you.
Creating a bundle is really easy: just create a folder in the Finder and end the name with .indigoPlugin. The Finder will prompt you about adding the extension .indigoPlugin. Click “Add”, and now your folder appears as a file. To get to the contents, right click on it and select Show Package Contents and it will open a separate window that is, in fact, just a new Finder window just like any other. In this window, you can create the folder structure above to have the elements that your plugin will need. Let’s go through each folder/file and discuss what it does.
First, though, you can see that there is only one top-level folder in the bundle - Contents. All other files/folders are inside that folder. This is the standard macOS bundle construction, so we decided to follow the pattern.
So, why did we go to the trouble of using the bundle format when there's just a file and a couple of folders? Because in future versions, we're going to add capabilities to the plugin bundle.
The Info.plist File
There’s only one file that’s directly inside the Contents folder, and it’s required (read very important). The Info.plist file is a standard XML property list file that contains several important key/value pairs. The keys in this file will help Indigo understand what functionality your plugin provides, what it’s name and version number are, etc.
Editing a plist file isn’t difficult since it's just a text XML file that looks like this:
<?xml version="1.0" encoding="UTF-8"?>
<!DOCTYPE plist PUBLIC "-//Apple//DTD PLIST 1.0//EN" "http://www.apple.com/DTDs/PropertyList-1.0.dtd">
<plist version="1.0">
<dict>
    <key>PluginVersion</key>
    <string>1.2.3</string>
    <key>ServerApiVersion</key>
    <string>2.0</string>
    <key>CFBundleDisplayName</key>
    <string>Rachio Sprinklers</string>
    <key>CFBundleIdentifier</key>
    <string>com.yourorgidentifier.yourpluginidentifier</string>
    <key>CFBundleVersion</key>
    <string>1.0.1</string>
    <key>CFBundleURLTypes</key>
    <array>
        <dict>
            <key>CFBundleURLName</key>
            <string>https://somehost.com/path/to/help/</string>
        </dict>
    </array>
</dict>
</plist>
Here is what they keys are for:
PluginVersion(Plugin version) - this is the version number for your plugin - it’s shown to the user in the UI and will help you when supporting your plugin users. This key is required and should only contain numerical characters and periods (0-9 and .). For example, "1.0.5.2" is valid, but "1.0.5b2" is not. This is very important as it will help Indigo determine what do to when a user double-clicks a plugin to install it. If the version number is a higher version, Indigo will notify the user that the plugin will be installed and enabled. If the version number is lower than an already-installed version, Indigo will prompt the user to confirm that they want to downgrade the plugin. The version number is also used in version checking, and may eventually be used for automatic updates.ServerApiVersion(Server API version) - this value refers to the minimum server API version your plugin requires. In other words, if your plugin requires server API version 3.0, users must be running Indigo 2022.1.0 or later (the first Indigo version that supports server API version 3.0). Otherwise, Indigo will not allow the plugin to be installed. In rare circumstances, a new server API version may deprecate prior functions, so it's best to review the API Version Chart as new API versions are released.CFBundleDisplayName(Bundle display name) - this is a standard macOS key, and its value represents the name of your plugin. It’s used in a bunch of places in the UI, so make sure that it appropriately identifies your plugin. This key is required.CFBundleName(Bundle name) - this is another standard macOS key, and it's a name that should be less than 16 characters long and be suitable for displaying in menu items with various strings appended (i.e. "ShortName Device Controls"). If it's not provided we'll use the bundle display name instead.CFBundleIdentifier(Bundle identifier) - this is another standard macOS key, and it represents a unique string that represents your plugin. This is used for namespacing where necessary in the code, so it is critical that it is unique. The standard reverse DNS naming scheme is what should be used, although if you aren’t a company you’ll need to figure something out (maybe your blog, etc.). You should limit your bundle id to standard alphanumerics as special/extended characters may cause problems. You should not use the*com.yourorgidentifier.**namespace. This key is required.CFBundleVersion(Bundle version) - another standard macOS key, and it represents the layout of the bundle. This is controlled by us. This key is required.CFBundleURLTypes(URL types) - you must specify one URL that represents a web page where your user can get support. Your plugin will have a menu item called "About [PLUGIN NAME]" - when the user selects this menu item, the default browser will open to this URL. Note - this can be a link to your plugin's GitHub repo wiki if there is one, or could be a forum topic in the “User Contributions” section of our user forums if you don’t have any other place to host the support page. This key is required.
We want the user experience to be very similar for plugins, at least until it comes to configuration and use of the plugin, so you should be careful to get the Info.plist correct.
Menu Items Folder
You can drop Python scripts into this folder, and they will show up in your plugin's sub-menu on the new "Plugins" menu. When the user selects the menu item, the script is executed. This is a really simple way of giving your plugin some visible UI.
Resources Folder
This folder is meant to contain any assets (like images, templates, etc.) that your plugin might need.
If there is an icon.png file in here, it will be displayed in the Plugin Store once you submit the plugin to the Indigo Plugin Store. Note that the code that loads config UI XML templates assumes that the Server Plugin folder is the root, so those template files should always be in the Server Plugin tree (i.e., Server Plugin/Templates/my_template.xml).
If this folder contains any of the following sub-folders, that content will be made available directly from the Indigo Web Server:
| Folder | Authentication | Description |
|---|---|---|
images |
IWS Configured | Any images in this folder or any sub-folders will be delivered if the user is authenticated via whatever authentication methods are enabled for IWS (digest, basic, api key). |
public |
None (open to all) | Any files in this folder or any sub-folders will be delivered to anyone without any authentication. |
static |
IWS Configured | Any files in this folder or any sub-folders will be delivered if the user is authenticated via whatever authentication methods are enabled for IWS (digest, basic, api key). |
videos |
IWS Configured | Any files in this folder or any sub-folders will be delivered if the user is authenticated via whatever authentication methods are enabled for IWS (digest, basic, api key). |
The URL for those files will be constructed using the plugin's id followed by the path. Here are some examples:
- https://yourreflector.indigodomo.net/com.your.pluginid/static/html/something.html
- http://localhost:PORT/com.your.pluginid/images/an_image.png
- http://YourServer.local:PORT/com.your.pluginid/public/open_to_all.txt
Packages Folder
This folder is optional, but it's useful when your users will need to install additional Python packages in order to use your plugin. Any library installs should be directed to the ../Contents/Packages/ folder. Note that this may be required in future versions of Indigo. See the Python Packages and Indigo page for more information.
Indigo Server Plugins
The most comprehensive way to extend Indigo is by implementing a Server Plugin. This mechanism allows you to add native components such as device types, events, actions, and menu items. Because we didn’t want to make the server plugin mechanism dependent on any single OS architecture, we decided to implement them in Python and have the description and user interface for the plugins’ components described in HTML and XML files respectively. We chose Python for several reasons:
- it’s object-oriented nature fits well with the IndigoServer’s representations of various objects
- it is easily interfaced with C++ - which is what the server is written in
- it’s cross-platform so there’s a lot of documentation and expertise out there (many hardware makers supply a Python interface to their hardware)
- it’s easy to learn (really - we promise)
Likewise, we chose XML because it’s very readable and universally understood and supported. We will not discuss XML in general in this document, but we believe that even those developers that aren’t familiar with XML will be able to quickly grasp the concepts since HTML is structurally similar. If you find understanding XML challenging, there are plenty of resources both on the web and in print that can help you get up to speed.
Building a Server Plugin vs Scripting IOM
The IOM is used for two similar purposes: scripting Indigo and building Server Plugins. They aren’t mutually exclusive, but they serve different needs. For instance, you may just want to write an embedded Python script action that just does some specific things vs building a full Server Plugin. Likewise, you may be interested in building a Server Plugin that doesn’t actually create any new device types, but simply adds events, actions, and menus to Indigo.
Indigo Plugin Host
Before we get to the specifics, let’s describe the process by which your plugin will get executed. Each Server Plugin will be launched in a special application called the Indigo Plugin Host (IPH). Each plugin will have its own instance of an IPH as well, so one plugin isn’t likely to bring down another or the IndigoServer.
The IPH communicates with the IndigoServer through the XML interface the IndigoServer provides. But, fear not, the IPH hides all this complexity from you. It creates and manages C++ objects (and bridges them to native Python objects) that represent the Indigo Object Model (IOM), deals with communication with the IndigoServer, and makes sure that the IOM is kept in sync with the IndigoServer.
More specifically, the IOM is presented to your plugin as a python module called indigo, that all plugins automatically import. Every object that represents an Indigo object and every command that you use to communicate with Indigo is done through the indigo module. For example, to write something to the Indigo Log, you would do this:
indigo.server.log(“Write this to the event log”)
To have the server speak a text message using your Mac's built-in speech synthesizer:
indigo.server.speak("Message to speak")
We describe the IOM in detail in the IOM Reference Guide.
The IndigoServer will manage the IPH for your plugin - starting it at IndigoServer startup or when the user enables your plugin, shutting it down at IndigoServer shutdown time or when the user disables your plugin. You never need to worry about process management or what happens when your plugin fails. IndigoServer will attempt to restart a failed plugin and warn the user when it can’t.
Plugin Failure Handling
For robustness and performance, plugins are executed inside their own process sandbox by a special Indigo application wrapper called the Indigo Plugin Host (see above). Runtime errors or crashes that occur within a plugin are handled differently based on when and where they occur:
-
Plugin Fatal: Errors that occur because of invalid XML or a failure inside the plugin initialization code (init method) are considered fatal. They will log an error and cause the Indigo Server to temporarily suspend the plugin -- the plugin will remain enabled but won't be running. Once the errors are corrected, the plugin can be restarted by its Reload menu option. Because the plugin is still in the enabled state, it will also be restarted on the next Indigo Server restart.
-
Plugin Auto-Restarted: If a plugin successfully initializes but then experiences a runtime crash (or is terminated via a kill signal not originating from an Indigo Server plugin disable request), then the Indigo Server will log an error and automatically restart the plugin after several seconds. This is only a crash fail-safe -- if your plugin has crashes then please fix the underlying problem (or forward the information to us if you think the problem is in the Indigo Plugin Host). If a plugin crashes multiple times over a short period of time, then the Indigo Server may slow or suppress its plugin auto-restart functionality requiring the plugin to be manually restarted via the Reload menu item.
-
Concurrent Thread Auto-Restarted: If a plugin defines runConcurrentThread() and an uncaught python exception is thrown within that method, then the Indigo Plugin Host will automatically (after several seconds) create a new thread and again call runConcurrentThread(). An error will also be logged with a call stack trace. In general, plugins should catch and handle common errors (hardware communication problems, out-of-bounds parameters, etc.) themselves inside runConcurrentThread(). The thread restart functionality implemented by the plugin Indigo Plugin Host is a fail-safe in case an error isn't handled, and should only be relied on for unexpected errors (if at all).
-
Error Logged: If an uncaught python exception is thrown out of any callback method (deviceStartComm, deviceStopComm, validatePrefsConfigUi, validateDeviceConfigUi, actionControlDimmerRelay, etc.) then an error will be logged with a call stack trace. In general, plugins should catch and handle common errors (hardware communication problems, out-of-bounds parameters, etc.) themselves. Errors logged for uncaught exceptions should be used by developers to implement their own (and more user-friendly) error handling.
Server Plugin Folder
The structure of the Server Plugin directory in the plugin bundle is something like this:
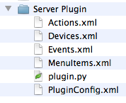
Each of the XML files describes the components that your plugin provides. You must also have at least the plugin.py file which is the entry point into the Python code that executes your plugin. Beyond that, you may create any other structure you like inside the folder. We’ll go over each file in detail, but first we should discuss the general characteristics of the XML files.
Note: you can’t edit generic XML documents like these with the Property List Editor application - it will only edit correctly formatted property lists (which are XML, but specially formatted). You’ll need to use a generic text editor such as TextMate, TextWrangler, BBEdit or Xcode.
Indigo Plugin XML Conventions
The Indigo plugin XML is formulated with a few rules that will help you navigate it’s constituent parts. Elements, such as Field, Action, Device, etc., will always start with a capital letter. Attributes, such as id, type, defaultValue, etc., will always start with a lowerCase letter. Both elements and attributes will be camel case - that is, aside from the initial character described above, each new word will be capitalized.
Important
Most of the major elements will have an id of some kind. It's extremely important that you follow these rules when creating the id.
id's:
- can contain letters, numbers, and other ASCII characters,
- cannot start with a number or punctuation character,
- cannot start with the letters xml (XML, Xml, etc.), and
- cannot contain spaces.
Adding Your Plugins to the Plugin Store
This section outlines the rules for submitting a plugin to the Indigo Plugin Store. While it may seem like a lot, it's mostly common sense. You can start the process from the Plugin Contributions section of your Indigo Account.
Creating Your Developer Account
If you haven't already, you'll need to go to the Plugin Contributions page in your Indigo Account and add your developer information:
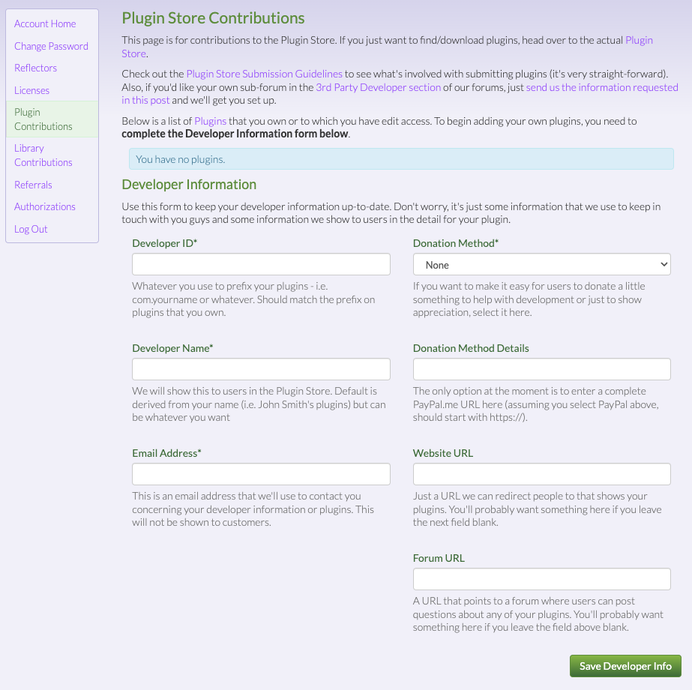
Please read through the entire top section of that page as it contains important information.
Warning: please do not use com.indigodomo or com.perceptiveautomation as your developer ID (or embed those in your developer ID). Those are our internal IDs and should not be used.
Two Ways to Add a Plugin
First and foremost: please do not attempt to add a plugin that you don't "own." If a developer of a plugin has abandoned it and you would like to take it over, please let us know and we'll take it from there (we've done this in the past and it's usually not a problem). Once we get permission we'll let you know and we can coordinate from there. If the developer is still active, let them know that you'd like to see it in the Plugin Store.
There are two ways to add a plugin:
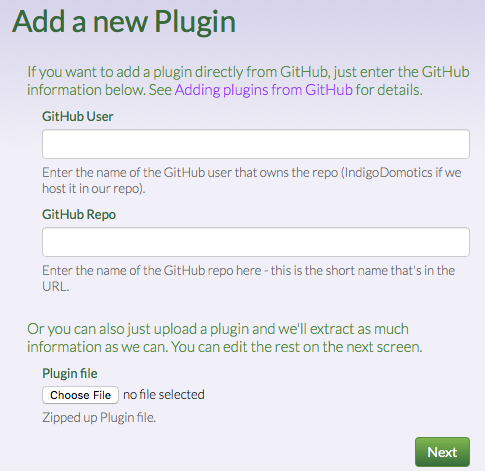
The first and recommended option is via a GitHub Repository. You'll manage your plugin almost completely through GitHub. You'll create releases there, manage the various descriptions, etc. You will have the option to override some of that information in the plugin administration UI that we provide, but you'll likely find that managing everything through GitHub will be a better and more consistent experience.
The other option is to directly manage everything through our UI. With this approach you'll create your own plugin releases and upload each new release via our plugin administration UI. You'll need to manage all descriptions through our UI. If you don't want to learn how to use GitHub then this is the option for you.
General Rules
First, some general rules that you need to follow regardless of which approach you take:
- Version numbers in the
Info.plistfile must be of the form X.Y.Z (except the ServerApiVersion, which is X.Y). There are no beta/pre-release signifiers allowed. - No two releases can have the same version number (X.Y.Z).
- The Plugin ID (CFBundleIdentifier) can't change once a plugin has been added.
- The Plugin ID must begin with your developer ID specified above. This should not begin with
com.indigodomoorcom.perceptiveautomation. So, if you specifiedcom.johnsmithas your developer ID, your plugin IDs would look likecom.johnsmith.myfirstplugin. - If the
Contents/Resources/icon.pngfile exists in your Plugin bundle it will be used as the icon in the store (the icon will be used if the file doesn't exist). See Icons and Branding below for more details.
 - Plugins and releases can only be deleted by Indigo Domotics staff. Email us with details if you need a release removed.
GitHub Specifics
If you want to use GitHub (and there are many advantages to doing so), there are a few things to consider. We have a few (but not many) requirements in how your repo is constructed and how you do releases. There are also some optional things that you'll want to consider to make the experience for users even better.
If you're new to GitHub but want to try it out, we've written a simple How-To with lots of screen captures describing one way to set up your repository.
GitHub Repo Layout
This is the required GitHub Repo layout:
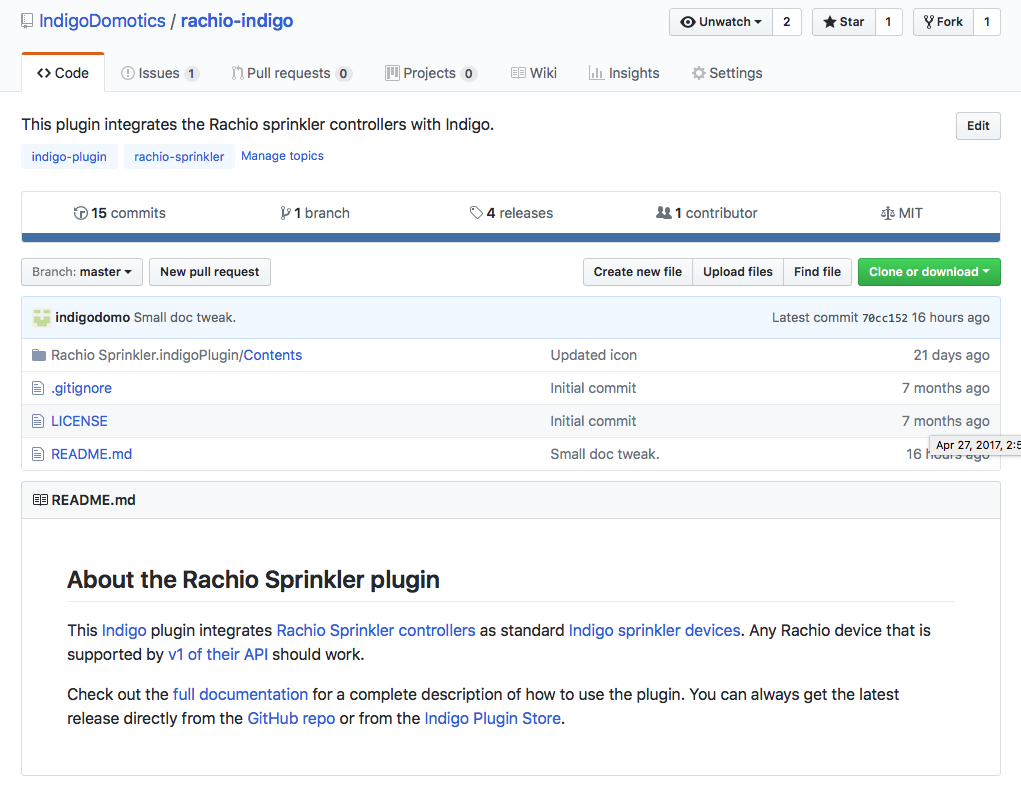
At the top level of the repo should be your plugin folder and an optional README file. You may have other files in there as well, like the LICENSE file in the rachio-indigo repo above. The plugin is there for obvious reasons — it's the path into the source for your plugin. The README file's contents will automatically be used as the plugin's description and shown on the About tab on your Plugin's detail page:
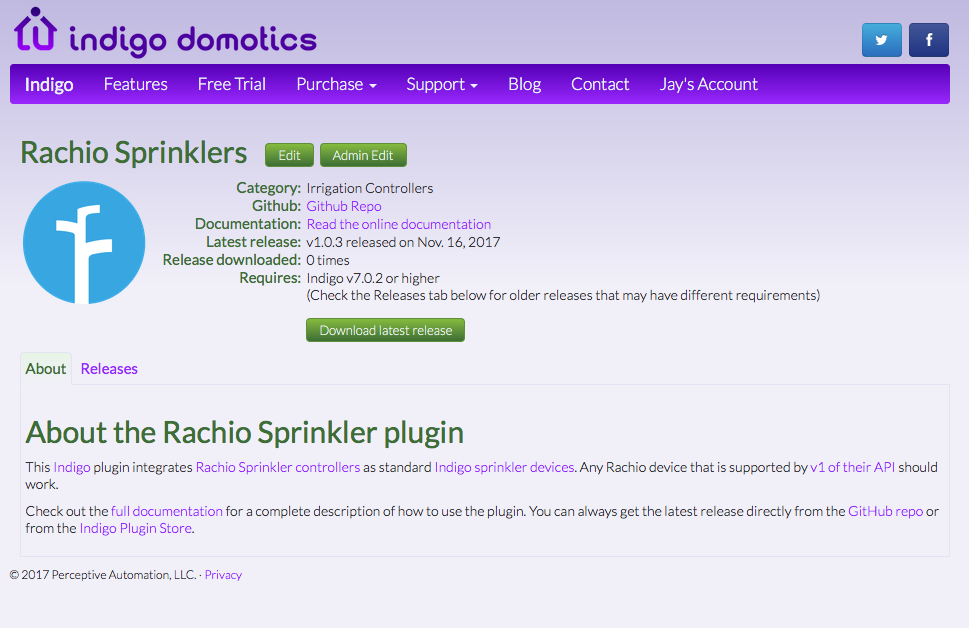
Markdown in the README.md file will be rendered correctly in the Plugin Store though you can also use a plain text file (README.txt).
GitHub Releases
When you are ready to publicly release a version of the plugin (either initially or a follow-up release), you should add a release in GitHub:
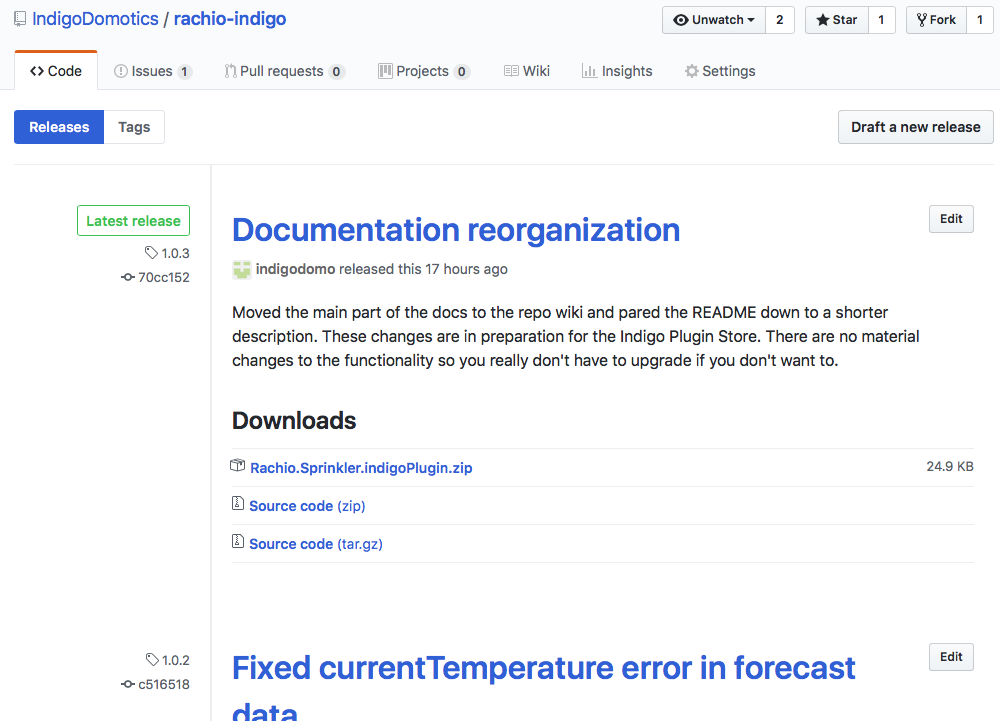
We do not look at the "master branch" (or "tips") of the repo. Only published releases (not pre-releases) will be added to the Plugin Store's release list (see Adding a GitHub Release below for details). The Plugin Store currently doesn't support listing betas (pre-releases) but you can still create them and point your beta testers to them on GitHub (one of the advantages to using GitHub).
Release Requirements
There are a few requirements for GitHub releases:
- The GitHub release tag # must match PluginVersion in the
Info.plistfile, otherwise the release will be rejected when added to the Plugin Store. Note: we will be looking in the source code zipball from the release for the Info.plist, not the attached plugin. If you're getting the mismatch error, that's where you'll need to look to fix any mismatching version numbers. - The
README.mdorREADME.txtfile must be at the top level of the archive for it to automatically be used. This is to avoid issues if your plugin includes other source projects that may also have their own README files. - Although optional, we strongly encourage you to add a zipped version of just the plugin folder (not the entire repo) to each release. Make sure that
indigoPluginis in the name and that it's a zip file (i.e.MyPlugin.indigoPlugin.zip) and make sure that there aren't any other zip files attached to the release. If you don't include an attached zipped plugin, the user will download a zipped copy of the repo itself, including the plugin, the README, etc. (basically everything in the repo). This may make it confusing for users to find and install the plugin.
Adding a Plugin
As we mentioned at the top, there are two ways to add a new plugin to the Plugin Store: by specifying a GitHub repo or by uploading an existing plugin:
Note
There is no automated way to convert between a GitHub-based plugin and a directly managed plugin, so please carefully consider which approach you want to use before initially adding the plugin (we recommend GitHub!). We can manually convert between the two, but it takes some time and effort.
Adding a Plugin from GitHub
To add a new plugin from a GitHub repo, just enter the GitHub user and repo names. As an example, for our Rachio Sprinkler repo, which is located here:
https://github.com/IndigoDomotics/rachio-indigo
We entered IndigoDomotics for the user and rachio-indigo as the repo. Note your repo must have at least one published release to be added to the Plugin Store.
Click the Next button and you'll see the following page with the appropriate data pre-populated:
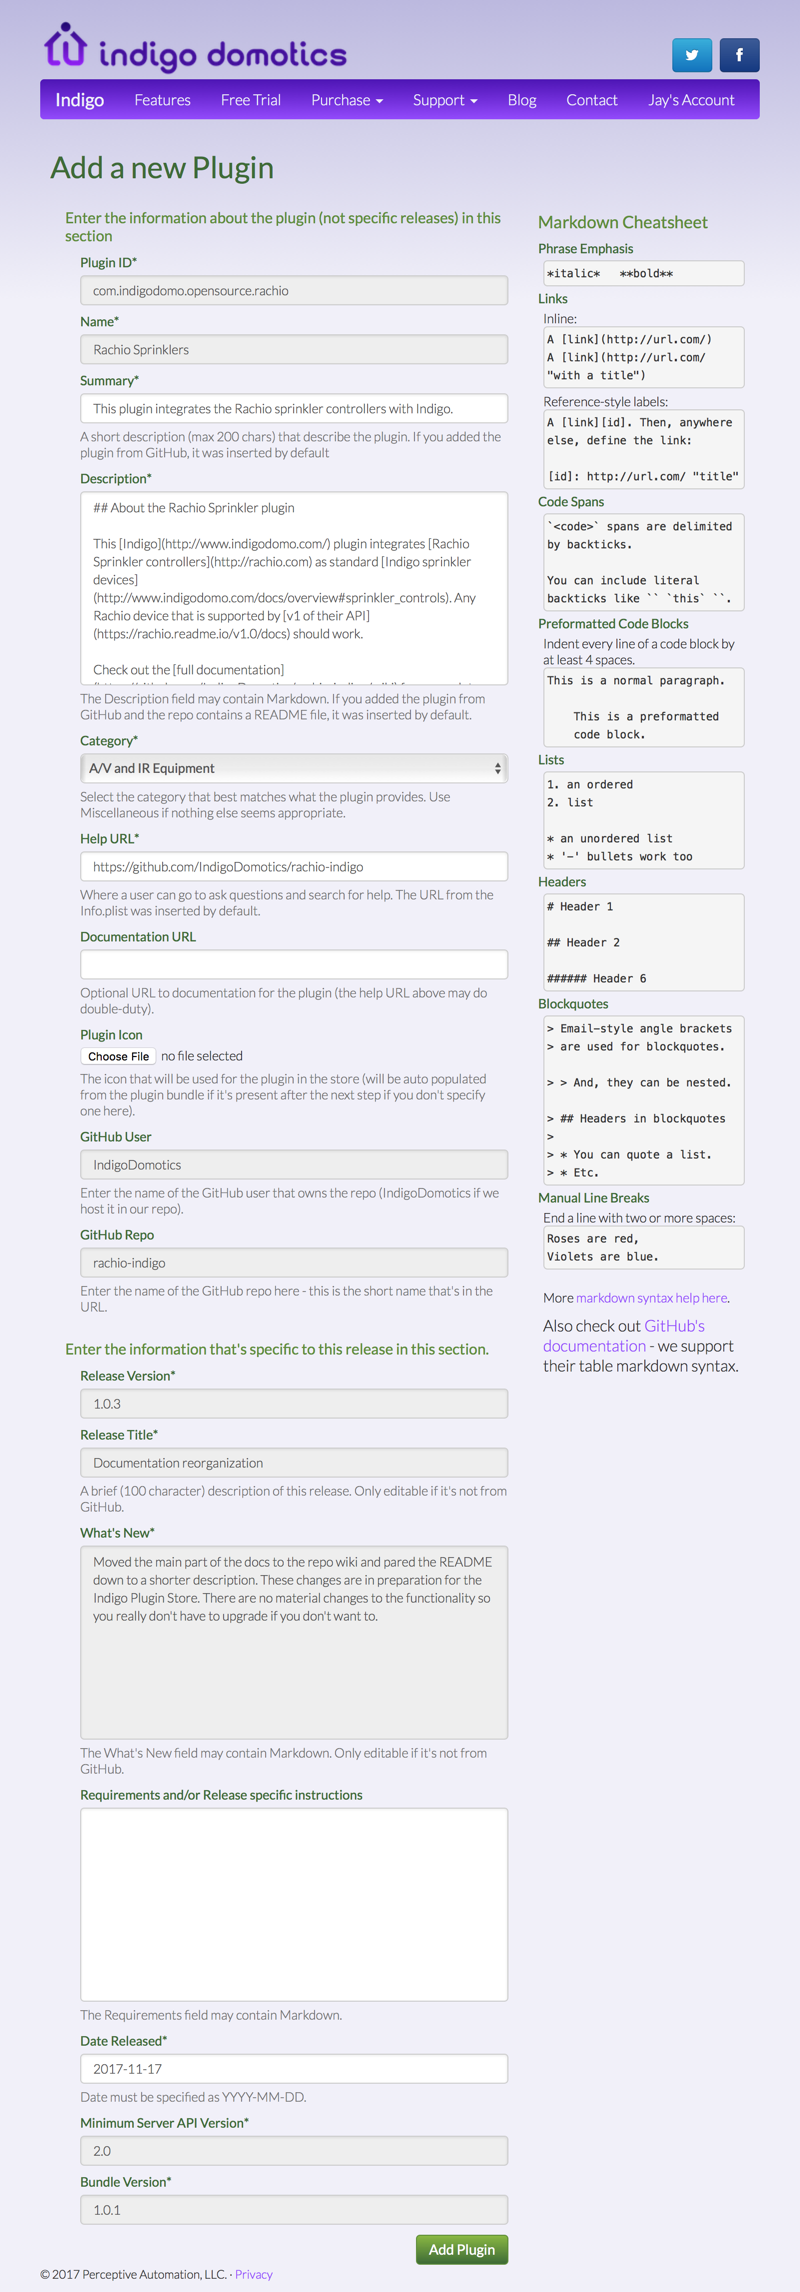
This form has a variety of fields (some read-only) that fall into two groups. The first group are fields about the plugin itself (not any specific release of the plugin):
- Plugin ID — the ID from the
Info.plistfile (read-only). - Name — the name from the
Info.plistfile (read-only). - Summary* — a very brief (200 character) summary of your plugin. It is pre-populated with the description for your GitHub repo but you may edit it as you want. It will never be overwritten from GitHub.
- Description* — the
READMEfile's contents from the repo will be inserted here. It may contain Markdown and you can edit it to make any changes you like. You will have the option of updating it from GitHub when you add new releases. - Category — the major category of your plugin. If you can't find one that seems suitable, then select Miscellaneous. This can be changed later.
- Help URL* — the help URL pre-populated from the
Info.plist. You may override it and it will never be overwritten automatically. - Documentation URL — a separate and optional URL that can point to more comprehensive documentation. This is a good place to put the URL to the GitHub wiki for this repo (see the Rachio Plugin's wiki page for an example).
- Plugin Icon — if your plugin's bundle has an icon (
Contents/Resources/icon.pngfile) then it will automatically be used if you leave this field blank. Alternately, you can add a PNG file here. - GitHub User and Repo — a read-only copy of what you entered on the first screen.
And the next section is specific information about the release that you're adding:
- Release Version — automatically retrieved from the releases section of GitHub. If you have more than one release in the repo, this will be the most recent (only repos that are not pre-release or draft are used). Note: the release version number in the GitHub release source zip's Info.plist must match the tag for the GitHub release. Otherwise, the release will not be added. This sanity check will help ensure that you don't end up with version mismatches and the associated problems that will result (failed update checking, failed upgrades, etc).
- Release Title — also retrieved from GitHub, it's the short release title.
- What's New — again, retrieved from GitHub, this is the full description of the release.
- Requirements — an optional separate field that may contain Markdown. The intention of this field is to outline any specific requirements or steps needed for this release. GitHub doesn't have anywhere (other than the release description) to put this kind of information. You may, of course, just add it to the description (and therefore the What's New section) and leave this field blank. We won't show it if it's blank.
- Date Released — the release date as specified in the GitHub release info. You can change it here if you like, using the YYYY-MM-DD format. Note if you change it to some date in the future it won't show up in the Plugin Store until that date.
- Server API and Bundle Versions — retrieved from the
Info.plistand just shown here for completeness. The Server API version is particularly important in that it determines what's shown as the minimum Indigo version required to use the plugin.
Required fields are marked with an asterisk (*). The majority of GitHub repos will have all the information needed for the required fields so it's only likely that you'll have to edit the Category field as a minimum (and if your plugin is an A/V or IR plugin you won't even have to do that!). Once you have reviewed all the form fields hit Add Plugin.
You'll notice that on the right side of the screen we've provided a quick cheatsheet for Markdown syntax. This will be helpful when editing any fields that allow Markdown.
Adding a Directly Managed Plugin
To add a new plugin from an existing zipped plugin, just click the Choose File button and select the file. Note that Safari will automatically zip plugin folders before uploading (but your browser of choice may not).
Click the Next button and you'll see the following page (with the appropriate data pre-populated):
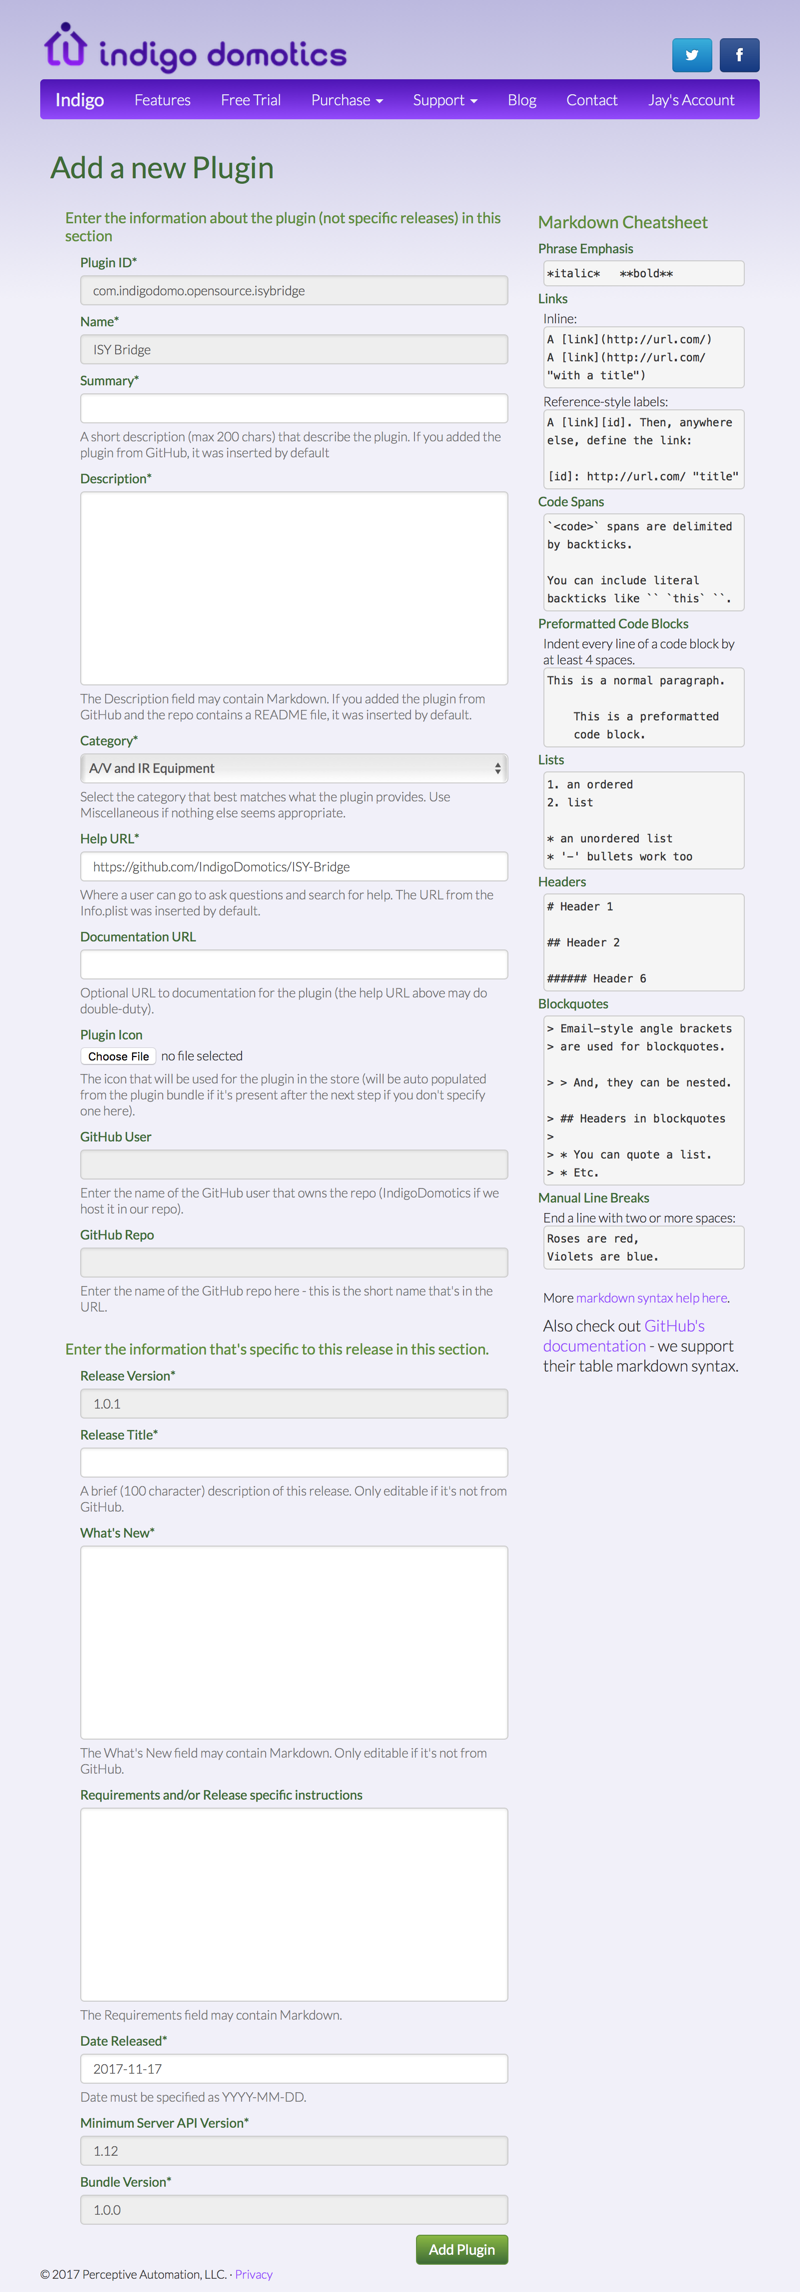
This form has a variety of fields (some read-only) that fall into two groups. The first group are fields about the plugin itself (not any specific release of the plugin):
- Plugin ID — the ID from the
Info.plistfile (read-only). - Name — the name from the
Info.plistfile (read-only). - Summary* — a very brief (200 character) summary of your plugin.
- Description* — a full description of what your plugin does. The field may contain Markdown.
- Category — the major category of your plugin. If you can't find one that seems suitable, then select Miscellaneous.
- Help URL* — the help URL pre-populated from the
Info.plist. You may override it and it will never be overwritten automatically. Commonly developers use this URL to point to a specific post on their own sub-forum. - Documentation URL — a separate and optional URL that can point to more comprehensive documentation. So if you have a forum post that contains the documentation for the plugin for instance (and if it's different than the Help URL) then this is the place to put it.
- Plugin Icon — if your plugin's bundle has an icon (at
Contents/Resources/icon.png) then it will automatically be used if you leave this field blank. Alternately, you can add a PNG file here that will be used in the plugin's display in the Plugin Store. - GitHub User and Repo — disabled since this plugin will be managed directly through our pages.
And the next section is specific information about the release that you're adding:
- Release Version — automatically retrieved from the
Info.plistfile. - Release Title* — a short summary (100 characters max) of this release of the plugin.
- What's New* — a full description of the release. This field may contain Markdown.
- Requirements — an optional separate field that may contain Markdown. The intention of this field is to outline any specific requirements or steps needed for this release. You may, of course, just add it to the What's New section and leave this field blank. We won't show it if it's blank.
- Date Released — the release date defaulting to today. You can change it here if you like, using the YYYY-MM-DD format. Note, if you change it to some date in the future it won't show up in the Plugin Store until that date.
- Server API and Bundle Versions — retrieved from the
Info.plistand just shown here for completeness. The Server API version is particularly important in that it determines what's shown as the minimum Indigo version required to use the plugin.
Required fields are marked with an asterisk (*). Once you've filled out the form hit Add Plugin.
You'll notice that on the right side of the screen we've provided a quick cheatsheet for Markdown syntax. This will be helpful when editing any fields that allow Markdown.
Editing a Plugin
To edit a plugin, just go to your Indigo Account's Plugin Contributions page, find the release in the list and click the Edit button. You'll be able to change all editable fields there.
Adding a Release
When you have an update to a plugin, you just need to add a release to it. Go to the Plugin Contributions section of your Indigo Account, find the plugin, and click either the Edit/Add Release button for GitHub plugins or the Add Release button for directly managed plugins.
Adding a GitHub Release
Adding a GitHub release couldn't be easier. Once you've clicked the Edit/Add Release button, you'll see the plugin edit form where you can edit the plugin and release information. At the bottom of the form, you'll see the following checkboxes:
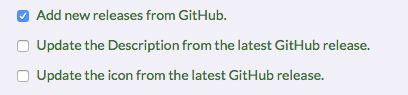
The first checkbox is automatically checked and therefore when you Save the form it will add any new releases. The next checkbox will update the main plugin description with the README file from the most recent release, and the last checkbox will update the icon from the most recent release. Super simple!
Note: the release version number in the GitHub release source zip's Info.plist must match the tag for the GitHub release. Otherwise, the release will not be added. This sanity check will help ensure that you don't end up with version mismatches and the associated problems that will result (failed update checking, failed upgrades, etc).
Adding a Release for a Directly Managed Plugin
Adding a new release this way isn't really very hard either, there are just a few fields you need to fill out:
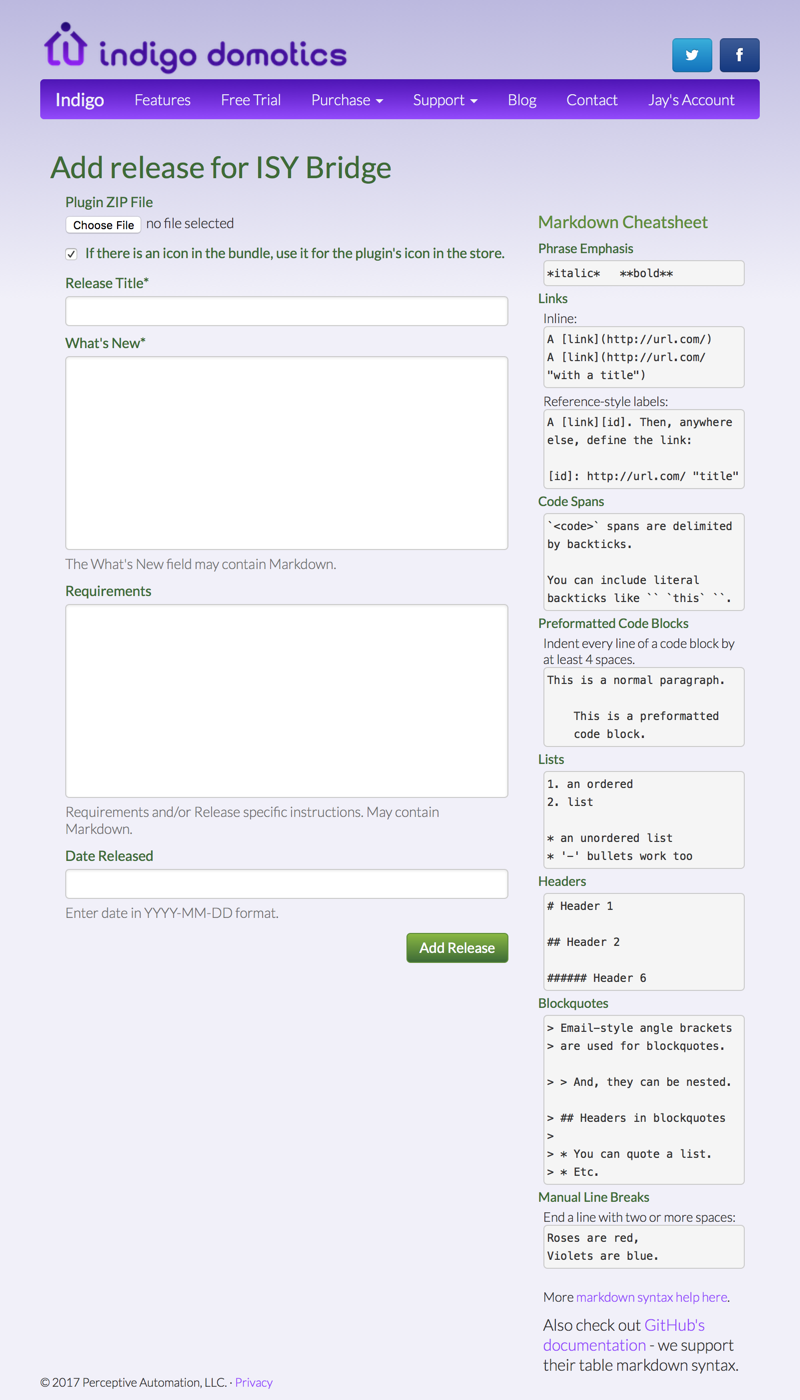
- Plugin ZIP File — click the Choose File button and select the plugin folder. Note that Safari will automatically zip plugin folders before uploading (but your browser of choice may not).
- If there is an icon in the bundle, use it for the plugin's icon in the Plugin Store — if checked then the icon in the bundle will replace the icon currently being used.
- Release Title* — a short summary (100 characters max) of this release of the plugin.
- What's New* — a full release description. This field may contain Markdown.
- Requirements — an optional separate field that may contain Markdown. The intention of this field is to outline any specific requirements or steps needed for this release. You may, of course, just add it to the What's New section and leave this field blank. We won't show it if it's blank.
- Date Released — the release date defaulting to today. You can change it here if you like, using the YYYY-MM-DD format. Note, if you change it to some date in the future it won't show up in the Plugin Store until that date.
Required fields are marked with an asterisk (*). Once you've filled out the form hit Add Release.
You'll notice that on the right side of the screen we've provided a quick cheatsheet for Markdown syntax. This will be helpful when editing any fields that allow Markdown.
Editing a Release
To edit a release, just go to your plugin's detail page, switch to the Releases tab, expand the release you want to edit and click the Edit button. You'll be able to change all editable fields there.
Icons and Branding
The Plugin Store shows icons for each plugin. If you don't include one in the plugin bundle (Contents/Resources/icon.png) and you don't add one explicitly to the release (see Adding a Release for details) then the default Indigo Plugin icon will be shown.
To make it easy for users browsing the Plugin Store to identify something they're looking for, it's quite helpful to include an icon that represents what your plugin does. For instance, if you are integrating a specific vendor's products (like the Rachio Sprinkler example above) then you'll probably want to use their icon. Here are some tips to help find an appropriate icon:
- Many companies provide media links, including icons, that can be used for promotional purposes.
- Some do it as part of the developer API documentation (often under "marketing" or some such).
- You can often find logos on their social media accounts in the photograph sections.
We believe that the vast majority of companies won't mind you using their logos to promote their products as long as it's clear that you have no direct affiliation to the company. If there is an issue it's easy for us to remove.
Icon details: 256 × 256 is the optimal size. Images must be 128px high or they aren't going to look good (somewhat wider might work on some screen sizes). The icons must be .png files and the file name should always be icon.png. Note the macOS Preview app can be used to convert other image formats to .png.
Linking to Indigo Docs
If your plugin's documentation needs to link to Indigo's documentation, use the version-agnostic redirect URL so that your links always resolve to the current release of the docs:
https://www.indigodomo.com/docs/<path>
For example, https://www.indigodomo.com/docs/overview#sprinkler_controls maps to the most recent documentation for the sprinkler controls. If you need to pin a link to a specific release, you can link directly to a versioned page at https://docs.indigodomo.com/<version>/… instead.
A Few Final Thoughts
That's pretty much all there is to managing a plugin in the Plugin Store. Here are a few final random thoughts and important reminders:
- Putting your plugin on GitHub will encourage others to help you maintain the plugin. Wouldn't it be great if someone with a problem could actually fix it and submit a patch to you?
- We highly recommend that you attach a zipped plugin (don't forget to delete the
.pycfiles) in your GitHub releases. When users click the Download Release button in the Plugin Store, it will download just the zipped plugin (not the entire repo). It'll be much clearer to users what they need to do next. - The GitHub wiki page is the best way to provide documentation (see the Rachio and Alexa-Hue Bridge examples). The advantage to using the repo wiki is that others can help you maintain the documentation.
- The most common way to provide support for a plugin (see Help URL above) is via our online forum. You can request your own sub-forum and create topics (or children sub-forums) for each plugin.
- You may not delete plugins or releases — if you need to for some reason just let us know and we'll handle it.
- If you want to give someone else edit access (only edit, not add privileges) to your plugins, let us know and we can do that.
- If you need to change a plugin from Directly Managed to GitHub or vice versa, let us know. It's a manually intensive process so it may take us a few days to get everything converted but we will do it for you.